Category Archives: public cloud

Service Oriented Architecture vs Modern Microservices: Whats the difference?


Images thanks to http://martinfowler.com/articles/microservices.html and https://en.wikipedia.org/wiki/Service-oriented_architecture

I’ve been researching and working in the area of modern microservices for the past ~3 to 4 years and have always seen a strong relationship between Modern Microservices with tools and cultures like Docker and DevOps back to Service-Oriented Architecture (SOA) and design. I traced SOA roots back to Gartner Research in 1996 [2] or at least this is what I could find, feel free to correct me here if I haven’t pegged this. More importantly for this post I will briefly explore SOA concepts and design and how they relate to Modern Microservices.

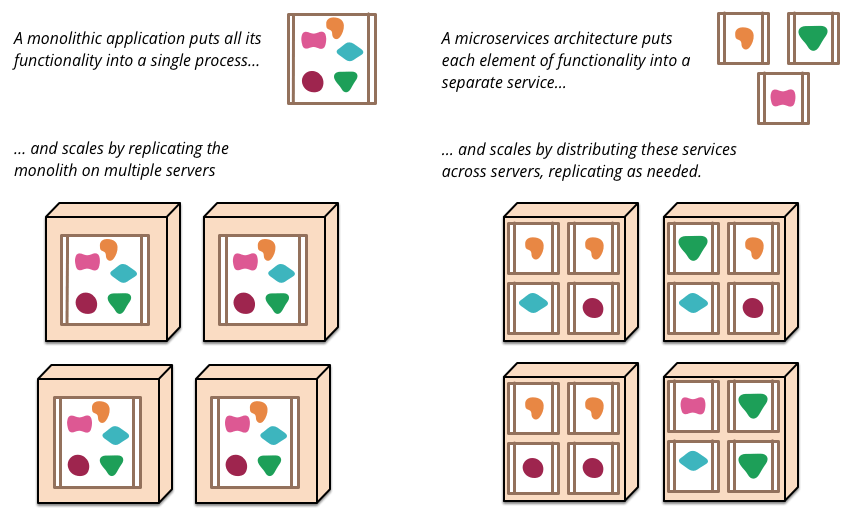
Microservice Architectures (MSA) (credit to meetups and conversations with folks at meetups), are typically RESTful and based on HTTP/JSON. MSA is an architectural style not a “thing” to conform exactly to. In other words, I view it as more of a guideline. MSAs are derived from multiple code bases and each microservice (MS) has or can have its own language it’s written in. Because of this, MSAs typically have better readability and simpler deployments for each MS deployed which in turn leads to better release cycles as long as the organization surrounding the MS teams is put together effectively (more on that later). An MSA doesn’t NEED to be a polyglot of  but will often naturally become one because teams may be more familiar with one language over the other which helps delivery time especially if the interfaces between microservices are defined correctly, it truly doesn’t matter most of the time. It also enables scale at a finer level instead of worrying about the whole monolith which is more agile. Scaling a 100 lines of Golang that does one thing well can be achieved much easier when you dont have to worry about other parts of your application that dont need or you dont want to scale in the monolith. In most modern MSAs, the REST interfaces mentioned earlier can be considered the “contract” between microservices in an MSA. These contracts should self describing as they can be, meaning using formats like JSON which is human readable and well-organized.

Overall an MSA doesn’t just have technical benefits but could also mean fewer reviews and approvals because of smaller context boundaries for each microservice team. Better acquisition and on-boarding because you dont have to be so strict about language preference, instead of retooling, you can ingest using polyglot.

Motivations for SOA, from what I have learned, is typically business transformation oriented which shouldn’t be surprising. The enterprise based SOA transformation on a large budget but the motivation is different now with modern MSA, now its quick ROI and better technology to help scale using DevOps practices and platforms.

Some things to consider while designing your modern MSA that I’ve heard and stuck with me:

  • Do not create too many services/microservices
  • Try not to manage your own infrastructure if you can
  • Dont make too many dependencies, (e.g. 1 calls 2 calls 3 calls 4 calls 5 ……)
  • Circuit Breaker Pattern, a control point between microservices.
  • Bulkhead, do not allow 1 problem affect the entire boat, each microservice has its own data service / database / connection pool, 1 service does not take down the whole system or other microservices.
  • Chaos testing (Add it to your test suite!)  Example: Chaos Monkey
  • You can do microservices with or without service discovery / catalog. Does it over complicate things?

The referenced text[1] that I use for a comparison or similar concepts and differences in this post talk about a vast number of important topics related to Service-Oriented Architecture. Such topics include the overall challenges of SOA, service reuse, deployment efficiency, integration of application and data, agility, flexibility, alignment, reference architectures, common semantics, semantic pitfalls, legacy application integration, governance, security, service discovery, inventory and registration, best practices and more. This post does not go into depth of each individual part but instead this post aims at looking at some of the similarities and differences of SOA and modern microservices.

Service-Oriented Architecture:

Some of concepts of SOA that I’d like to mention (not fully encompassing):

  • Technologies widely used were SOAP, XML, WSDL, XSD and lots of Java
  • SOAs typically had a Service Bus or ESB (Enterprise Service Bus) a complex middleware aimed at providing access and masking of interfaces.
  • Identification and Inventory
  • Value chain and business model is more about changing the entire business process

Modern Microservces:

  • Technologies widely used are JSON, REST/HTTP and Polyglot services.
  • Communication is done over HTTP and the interfaces are abstracted using RESTful contracts.
  • Service Discovery
  • Value chain and business model is about efficiencies, small teams and DevOps practices while eliminating cilos.
The Bulkhead Analogy

I want to spend a little bit of time on one of the analogies that stuck with me about modern microservices. This was the Bulkhead analogy which I cannot for the life of me remember where I heard it or seem to google a successful author so credit to who or whom ever you are.

The bulkhead analogy is pretty simple actually but has a powerful statement for microservice design. The analogy is such that a MSA, like a large ship is made up of many containers (or in the ships case, bulkheads) that have boundaries between them and hold different component of the ships such as engines, cargo, pumps etc. In MSA, these containers hold different functions or processes that do something wether its handle auth requests, connection to a DB, service a lookup or transformation mechanism it doesn’t matter, just that in both cases you want all containers to be un-damaged for everything to be running the best it can.

The bulkhead analogy goes further to say that if a container gets damaged and takes on water then the entire ship should not sink due to one or few failures. In MSA this can be applied by saying that a few broken microservices should not be designed in a way where there failure would take down your entire application or business process. It essence designs the bulkheads or containers to take damage and remain afloat or “running”.

Again, this analogy is quite simple, but when designing your MSA it’s important to think about these details and is why doing things like proper RESTful design and Chaos testing is worth your time in the long run.

Similarities and Differences or the two architectures / architecture styles:

Given the little glimpse of information I’ve provided above about service oriented architectures and microservices architectures I want to spend a little time talking about the obvious similarities and differences.

Similarities

Both SOA and MSA do the following:

  • Code or service reuse
  • Loose coupling of services
  • Extensibility of the system as a whole
  • Well-defined, self-contained services or functions that overall help the business process or system
  • Services Registries/Catalogs to discover services

Differences

Some of the differences that stick out to me are:

  • Focus on business process, instead of the focus of many services making one important business process MSA focuses on allowing one thing (containerized process) to do one thing and do it well. This allows tighter context boundaries for microservices.
  • SOA tailors towards SOAP, XML, WSDL while MSA favors JSON, REST and Polyglot. This is one of the major differences to me, even though its just a tech difference this RESTful polyglot paradigm enables MSAs to thrive with todays developers.
  • The value chain and business model is more DevOps centric allowing the focus to be on loosely coupled teams that break down cilos and can focus on faster release cycles and CI/CD of their services rather than with SOA teams typically still had one monolithic view of the ESB and services without the DevOps focus.

Conclusion

Overall this post was mainly a complete high-level overview of what I think are some of the concepts and major differences between traditional SOA and Modern Microservices that stemmed from a course I took during my masters that explored SOA while I was in the industry working on Microservices. The main point I would say I have is that SOA and MSA are very similar but MSA being SOA’s offspring in a way using modern tooling and architecture approaches to todays scaleable data center.

Note* by no means did I cover SOA or MSA to do them any real justice, so I suggest looking into some of the topics talked about here or reading through some of the references below if your interested.

Cheers!

[1] Rosen, Michael “Applied SOA: Service-Oriented Design Architecture and Design Strategies”  Wiley, Publishing Inc. 2008

[2] Gartner Research “Service Oriented” Architectures, Part 1:” – //www.gartner.com/doc/code/29201

[3] “SOA fundamentals in a nutshell” Aka Sniv February 2015 http://www.ibm.com/developerworks/webservices/tutorials/ws-soa-ibmcertified/ws-soa-ibmcertified.html

Docker Remote Host Management with Openstack

Untitled
Screen Shot 2012-07-26 at 6.34.17 PM

So I decided to participate in #DockerGlobalHackday and oh boy was it a learning experience. First off, the hackday started off with great presentations from some of the hackers and docker contributors. One that caught my eye was Host Management (https://www.youtube.com/watch?v=lZGmvGw-mWc) and (https://github.com/docker/docker/issues/8681)

Ben Firshman and contributors thought up and created this feature for Docker that lets you provision remote daemons on demand given cloud providers. It had me thinking that maybe I should hack on a driver for a Local Openstack Deployment. So I did, and this is my DockerHackDayHack.

https://github.com/wallnerryan/docker/tree/host-managment-openstack 

https://github.com/bfirsh/docker/pull/13

*Note, the code is raw, very raw, I haven’t coded in Go until this Hackday 🙂 Which is what I guess it is good for.

*Note this code was developed using Devstack with Flat Network orignaly, so there is some rough edged code for supporting out of the box devstack with nova network but it probably won’t work 🙂 I’ll make an update on this soon.

*Note the working example was testing on Openstack Icehouse with Neutron Networking. Neutron has one public and one private network. The public network is where the floating ip comes from for the docker daemon.

Here are the options now for host-management:

./bundles/1.3.0-dev/binary/docker-1.3.0-dev hosts create
Screen Shot 2014-11-03 at 3.29.50 PM

Notice the areas with  “–openstack-” prefix, this is what was added. If your using neutron network then the network for floating ips is needed. The image can be a Ubuntu or Debian based cloud image, but must support Cloud-Init / Metadata Service. This is how the docker installation is injected.Below is an example of how to kickoff a new Docker OpenStack Daemon: (beware the command is quite long with openstack options, replace X.X.X.X with your keystone endpoint, as well as UUIDs of any openstack resources.) It also includes –openstack-nameserver, this is not required but in my case I was, and will inject a nameserver line into the resolve.conf of the image using Cloud-Init / Metadata Service

In the future I plan on making this so we don’t need as many UUIDs. but rather the driver will take text as input and search for the relevant UUIDs to use. ( limited time to hack on this )

#./bundles/1.3.0-dev/binary/docker-1.3.0-dev hosts create -d openstack

–openstack-image-id=”d4f62660-3f03-45b7-9f63-165814fea55e” \

–openstack-auth-endpoint=”http://X.X.X.X:5000/v2.0” \

–openstack-floating-net=”4a3beafb-2ecf-42ca-8de3-232e0d137931″ \

–openstack-username=”admin” \

–openstack-password=”danger” \

–openstack-tenant-id=”daad3fe7f60e42ea9a4e881c7343daef” \

–openstack-keypair=”keypair1″ \

–openstack-region-name=”regionOne” \

–openstack-net-id=”1664ddb9-8a14-48cd-9bee-a3d4f2fe16a0″ \

–openstack-flavor=”2″ \

-openstack-nameserver=”10.254.66.23″ \

–openstack-secgroup-id=“e3eb2dc6-4e67-4421-bce2-7d97e3fda356” \

openstack-dockerhost-1

The result you will see is: (with maybe some errors if your security groups are already setup)

#[2014-11-03T08:31:51.524125904-08:00] [info] Creating server.
#[2014-11-03T08:32:16.698970304-08:00] [info] Server created successfully.
#%!(EXTRA string=63323227-1c1e-40f6-9c25-78196010936b)[2014-11-03T08:32:17.888292214-08:00] [info] Created Floating Ip
#[2014-11-03T08:32:18.439105902-08:00] [info] “openstack-dockerhost-1” has been created and is now the active host. Docker commands #will now run against that host
If you specified a ubuntu image (I just downloaded the Ubuntu Cloud Img from here)The Docker Daemon will get deployed in a Ubuntu Server in openstack and the Daemon will start on port 2375
Screen Shot 2014-11-03 at 11.36.10 AM
The Instance will look somthing like this in the dashboard of openstack.
Screen Shot 2014-11-03 at 11.36.27 AM
Here is the floating ip association with the Daemon Host.
Screen Shot 2014-11-03 at 11.36.44 AM
And it’s fully functional, see some other Docker Hosts commands below. Here is a video of the deployment (https://www.youtube.com/watch?v=aBG3uL8g124)
(View Hosts)
./bundles/1.3.0-dev/binary/docker-1.3.0-dev hosts
Screen Shot 2014-11-03 at 3.17.30 PM
You can make either the local unix socket or the openstack node the active Daemon and you can use it like any other docker client. This “hosts” command can run locally on your laptop but your containers and daemon run in OpenStack.  One could see this feature replacing something like Boot2Docker.
(docker ps) – Shows containers running in your openstack deployed docker daemon
./bundles/1.3.0-dev/binary/docker-1.3.0-dev ps -a
Screen Shot 2014-11-19 at 10.15.30 AM
(View Remote Info)
./bundles/1.3.0-dev/binary/docker-1.3.0-dev info
Screen Shot 2014-11-03 at 3.18.48 PM
Thanks for the Docker community for putting these events together! Pretty cool! Happy Monday and Happy Dockering.
P.S. I also used a Packer/VirtualBox Setup for DevStack in the begining. Here is the Packer Config and the Preseed.cfg. Just download devstack and run it on there.
{
 "variables": {
 "ssh_name": "yourname",
 "ssh_pass": "password",
 "hostname": "packer-ubuntu-1204"
 },

 "builders": [{
 "type": "virtualbox-iso",
 "guest_os_type": "Ubuntu_64",

 "vboxmanage": [
 ["modifyvm", "{{.Name}}", "--vram", "32"],
 ["modifyvm", "{{.Name}}", "--memory", "2048"],
 ["modifyvm", "{{.Name}}","--natpf1", "web,tcp,,8080,,80"],
 ["modifyvm", "{{.Name}}","--natpf1", "fivethousand,tcp,,5000,,5000"],
 ["modifyvm", "{{.Name}}","--natpf1", "ninesixninesix,tcp,,9696,,9696"],
 ["modifyvm", "{{.Name}}","--natpf1", "eightsevensevenfour,tcp,,8774,,8774"],
 ["modifyvm", "{{.Name}}","--natpf1", "threefivethreefiveseven,tcp,,35357,,35357"]
 ],

 "disk_size" : 10000,

 "iso_url": "http://releases.ubuntu.com/precise/ubuntu-12.04.4-server-amd64.iso",
 "iso_checksum": "e83adb9af4ec0a039e6a5c6e145a34de",
 "iso_checksum_type": "md5",

 "http_directory" : "ubuntu_64",
 "http_port_min" : 9001,
 "http_port_max" : 9001,

 "ssh_username": "{{user `ssh_name`}}",
 "ssh_password": "{{user `ssh_pass`}}",
 "ssh_wait_timeout": "20m",

 "shutdown_command": "echo {{user `ssh_pass`}} | sudo -S shutdown -P now",

 "boot_command" : [
 "<esc><esc><enter><wait>",
 "/install/vmlinuz noapic ",
 "preseed/url=http://{{ .HTTPIP }}:{{ .HTTPPort }}/preseed.cfg ",
 "debian-installer=en_US auto locale=en_US kbd-chooser/method=us ",
 "hostname={{user `hostname`}} ",
 "fb=false debconf/frontend=noninteractive ",
 "keyboard-configuration/modelcode=SKIP keyboard-configuration/layout=USA ",
 "keyboard-configuration/variant=USA console-setup/ask_detect=false ",
 "initrd=/install/initrd.gz -- <enter>"
 ]
 }]
}


(Preseed.cfg Starts HERE)
# Some inspiration:
# * https://github.com/chrisroberts/vagrant-boxes/blob/master/definitions/precise-64/preseed.cfg
# * https://github.com/cal/vagrant-ubuntu-precise-64/blob/master/preseed.cfg

# English plx
d-i debian-installer/language string en
d-i debian-installer/locale string en_US.UTF-8
d-i localechooser/preferred-locale string en_US.UTF-8
d-i localechooser/supported-locales en_US.UTF-8

# Including keyboards
d-i console-setup/ask_detect boolean false
d-i keyboard-configuration/layout select USA
d-i keyboard-configuration/variant select USA
d-i keyboard-configuration/modelcode string pc105


# Just roll with it
d-i netcfg/get_hostname string this-host
d-i netcfg/get_domain string this-host

d-i time/zone string UTC
d-i clock-setup/utc-auto boolean true
d-i clock-setup/utc boolean true


# Choices: Dialog, Readline, Gnome, Kde, Editor, Noninteractive
d-i debconf debconf/frontend select Noninteractive

d-i pkgsel/install-language-support boolean false
tasksel tasksel/first multiselect standard, ubuntu-server


# Stuck between a rock and a HDD place
d-i partman-auto/method string lvm
d-i partman-lvm/confirm boolean true
d-i partman-lvm/device_remove_lvm boolean true
d-i partman-auto/choose_recipe select atomic

d-i partman/confirm_write_new_label boolean true
d-i partman/confirm_nooverwrite boolean true
d-i partman/choose_partition select finish
d-i partman/confirm boolean true

# Write the changes to disks and configure LVM?
d-i partman-lvm/confirm boolean true
d-i partman-lvm/confirm_nooverwrite boolean true
d-i partman-auto-lvm/guided_size string max

# No proxy, plx
d-i mirror/http/proxy string

# Default user, change
d-i passwd/user-fullname string yourname
d-i passwd/username string yourname
d-i passwd/user-password password password
d-i passwd/user-password-again password password
d-i user-setup/encrypt-home boolean false
d-i user-setup/allow-password-weak boolean true

# No language support packages.
d-i pkgsel/install-language-support boolean false

# Individual additional packages to install
d-i pkgsel/include string build-essential ssh

#For the update
d-i pkgsel/update-policy select none

# Whether to upgrade packages after debootstrap.
# Allowed values: none, safe-upgrade, full-upgrade
d-i pkgsel/upgrade select safe-upgrade

# Go grub, go!
d-i grub-installer/only_debian boolean true

d-i finish-install/reboot_in_progress note

COSBench, Intel’s Cloud Object Storage Bench-marking tool and how to visual it’s data with matplotlib


I am probably missing a few images here, but you get the point, Object Storage is here to stay. It’s becoming more popular as workloads move to cloud based application architecture where HTTP dominates at scale more than ever. So comes the need to be able to run performance tests on our (pick your favorite) open-source object-storage implementation… or not, if your not into it.

The tool I want to talk about it Intel’s COSBench, or “Cloud Object Storage Bench” if you will, a Java based performance benchmarking tool for Object Storage Systems. I’ll also touch on a neat way to visualize the data output by COSBench itself. COSBench defines itself in part:

COSBench is a benchmarking tool to measure the performance of Cloud Object Storage services. Object storage is an emerging technology that is different from traditional file systems (e.g., NFS) or block device systems (e.g., iSCSI). Amazon S3 and Openstack* swift are well-known object storage solutions. (https://github.com/intel-cloud/cosbench)

It allows you to run tests at scale using “Driver Nodes” and “Controller Nodes”. A Driver Node is the node that does the heavy lifting and generates the load that the test will be producing. A Controller Node collects metrics, orchestrates the jobs and keep track of which tests are running on which Drivers etc. Essentially the M&O/Dashboard. Read more about the specifics in the User Guide on Github (UserGuide). I wont go into detail about how to install in the post, I will just say the guide is pretty straight forward, I ran a multi-driver installation on top of OpenStack IceHouse to test Ceph (S3 and Swift Interfaces on the Rados Gateway) and Amazon S3 Directly.

What I will go into a bit is how to define a job, below is an example of how to setup a test for a Rados Gateway Swift endpoint using Ceph. As you can see below, I used a token from OpenStack using the keystoneclient, and an endpoint ending  in /swift/v1 in the “Storage” directive of the COSBench XML file. This small test will run a 100% READ test on 240 Objects in 12 different swift containers. This is what the “container=(#,#) and Objects=(#,#) denote. These objects will be in size Ranges of 25MB, meaning 25MB, 75MB, 175MB…etc.

screenshot1

After submitting the test you will see output in the Controller dashboard that looks like the below image. To get to this data yourself, click on the the “view details” next to the finished job, then click on “view details” next to the Stage ID of w<#>-s<#>-main with the name “main“. You can then click on the “view timeline status” underneath the General Report to get the below timeline data.

Screen Shot

This will give you a breakdown (I believe of every 5 seconds) of the performance metrics collected. The way the metrics are collected and how they are computed is explained in the User Guide (referenced above). If you click the “export CSV file” you can download the CSV version of the output for analysis. Which should look like the below excel sheet:

Screen Shot

Now to the fun part, with this data we can do some fun and interesting things with a python graphing library called matplotlib. Using this we can extract the data we want, like bandwidth, latency or throughput and draw graphs to better visualize our data. I have a few scripts that can be used to do this, made specifically to take input from a COSBench CSV file. Just start the script and pass it the CSV file. (more info on the Github page) https://github.com/wallnerryan/matplotlib-utils-cosbench

Run something like:

#cd matplotlib-utils-cosbench/
#python graph_data_bandwidth_bf.py <csv.file>

The output from the script will be a PNG graph image, the above command gives a graph of Bandwidth over Time in MB/s with a best fit line drawn through the graph. Go ahead, try it if you would like. The output will look something like the below image:

*(depending on your performance numbers, and relative hardware and environment, the graph may look very different)

constant-after-demo.

As a tip, in this case, my Y-Axis is capped at 250, because I know my data points did not go above 250MB/s, if they do, look at the lines around 68 in the source code, there is a message about how to change this. In this example it will look like the below image. (I had changed this one to be 250 based on the below code snippet)

Screen Shot

A note on the script, if you have a lot of data points the graphs can get junked up with data points being too close, there is a option to specify that you would only like the data points every X number of data points. (e.g it will read every 5th data point) Just pass in a separate argument in the form on an integer to the script at the end.

#python graph_data_bandwidth_bf.py <csv.file> <number>

Well, I hope this was interesting for some, and if you have any questions of comments please feel free to comment here or on my github or send me and email. Until next time, cheers.