Piping AWS output to Ansible Inventory

piping

I’ve had the opportunity to work with a few different infrastructure automation tools such as Puppet, Chef, Heat and CloudFormation but Ansible just has a simplicity to it that I like, although I admit I do have a strong preference for Puppet because i’ve used it extensively and have had good success with it.

In one of my previous project  I was creating a repeatable solution to create a Docker Swarm cluster (before SwarmKit) with Consul and Flocker. I wanted this to be completely scripted to I climbed on the shoulders of AWS, Ansible and Docker Machine.

The script would do 4 things.

  1. Initialize a security group in an existing VPC and create rules for the given setup.
  2. Create machines using Docker-Machine of Consul and Swarm
  3. Use AWS CLI to output the machines and pipe them to a python script that processes the JSON output and creates an Ansible inventory.
  4. Use the inventory to call Ansible to run something.

This flow can actually be used fairly reliable not only for what I used it for but to automate a lot of things, even expand an existing deployment.

An example of this workflow can be found here.

I’m going to focus on steps #3 and #4 here. First, we use the AWS CLI to output machine information and pass it to a script.

# List only running my-prefix* nodes
$ aws ec2 describe-instances \
   --filter Name=tag:Name,Values=my-prefix* \
   Name=instance-state-code,Values=16 --output=json | \
   python create_flocker_inventory.py

We use the instance-state-code of 16 as it corresponds with Running instances. You can find more codes here: http://docs.aws.amazon.com/AWSEC2/latest/APIReference/API_InstanceState.html. Then we choose JSON output using –output=json. 

Next, the important piece is the pipe ( `|` ). This signifies we pass the output from the command on the left of the | to the command on the right which is create_flocker_inventory.py so that the output is used as input to the script.

Shell-pipes.png

So what does the python script do with the output? Below is the script that I used to process the JSON output. It first setups up an _AGENT_YML variable that contains YAML for a configuration then the main() function takes the JSON from json.loads() in the script initialization and creates an array of dictionaries that represent instances and opens a file and writes each instance to the Ansible inventory file called “ansible_inventory”. After that the “agent.yml” is written to a file along with some secrets from the environment.

import os
import json
import sys


_AGENT_YML = """
version: 1
control-service:
  hostname: %s
  port: 4524
dataset:
  backend: aws
  access_key_id: %s
  secret_access_key: %s
  region: %s
  zone: %s
"""

def main(input_data):
    instances = [
        {
            u'ip': i[u'Instances'][0][u'PublicIpAddress'],
            u'name': i[u'Instances'][0][u'KeyName']
        }
        for i in input_data[u'Reservations']
    ]

    with open('./ansible_inventory', 'w') as inventory_output:
        inventory_output.write('[flocker_control_service]\n')
        inventory_output.write(instances[0][u'ip'] + '\n')
        inventory_output.write('\n')
        inventory_output.write('[flocker_agents]\n')
        for instance in instances:
            inventory_output.write(instance[u'ip'] + '\n')
        inventory_output.write('\n')
        inventory_output.write('[flocker_docker_plugin]\n')
        for instance in instances:
            inventory_output.write(instance[u'ip'] + '\n')
        inventory_output.write('\n')
        inventory_output.write('[nodes:children]\n')
        inventory_output.write('flocker_control_service\n')
        inventory_output.write('flocker_agents\n')
        inventory_output.write('flocker_docker_plugin\n')

    with open('./agent.yml', 'w') as agent_yml:
        agent_yml.write(_AGENT_YML % (instances[0][u'ip'], os.environ['AWS_ACCESS_KEY_ID'], os.environ['AWS_SECRET_ACCESS_KEY'], os.environ['MY_AWS_DEFAULT_REGION'], os.environ['MY_AWS_DEFAULT_REGION'] + os.environ['MY_AWS_ZONE']))


if __name__ == '__main__':
    if sys.stdin.isatty():
        raise SystemExit("Must pipe input into this script.")
    stdin_json = json.load(sys.stdin)
    main(stdin_json)

After this processes the JSON from the AWS CLI, all that remains is to run Ansible with our newly created Ansible inventory. In this case, we pass the inventory and configuration along with the ansible playbook we want for our installation.

$ ANSIBLE_HOST_KEY_CHECKING=false ansible-playbook \
 --key-file ${AWS_SSH_KEYPATH} \
 -i ./ansible_inventory \
 ./aws-flocker-installer.yml \
 --extra-vars "flocker_agent_yml_path=${PWD}/agent.yml"


Conclusion

Overall this flow can be used along with other Cloud CLI tools such as Azure, GCE etc that can output instance state that you can pipe to a script for more processing. It may not be the most effective way but if you want to get a semi complex environment up and running in a repeatable fashion for development needs it has worked pretty well to follow the “pre-setup_get-output_prcocess-output_install_config” flow outlined above.

Docker-based FIO I/O benchmarking

687474703a2f2f692e696d6775722e636f6d2f336f46443358502e706e67

What is FIO?

fio is a tool that will spawn a number of threads or processes doing a particular type of I/O action as specified by the user. The typical use of fio is to write a job file matching the I/O load one wants to simulate. – (https://linux.die.net/man/1/fio)

fio can be a great tool for helping to measure workload I/O of a specific application workload on a particular device or file. Fio proves to be a detailed benchmarking tool used for workloads today with many options. I personally came across the tool while working at EMC when needing to benchmark Disk I/O of application running in different Linux container runtimes. This leads me to my next topic.

Why Docker based fio-tools

One of the projects I was working on was using Docker on AWS and various private cloud deployments and we wanted to see how workloads performed on these different cloud environments inside Docker container with various CPU, Memory, Disk I/O limits with various block, flash, or DAS based storage devices.

One way to wanted to do this was to containerize fio and allow users to pass the workload configuration and disk to the container that was doing the testing.

The first part of this was to containerize fio with the option to pass in JOB files by pathname or by a URL such as a raw Github Gist.

The Dockerfile (below) is based on Ubuntu 14 which admittedly can be smaller but we can easily install fio and pass a CMD script called run.sh.

FROM ubuntu:14.10
MAINTAINER <Ryan Wallner ryan.wallner@clusterhq.com>

RUN sed -i -e 's/archive.ubuntu.com/old-releases.ubuntu.com/g' /etc/apt/sources.list
RUN apt-get -y update && apt-get -y install fio wget

VOLUME /tmp/fio-data
ADD run.sh /opt/run.sh
RUN chmod +x /opt/run.sh
WORKDIR /tmp/fio-data
CMD ["/opt/run.sh"]

What does run.sh do? This script does a few things, is checked that you are passing a JOBFILE name (fio job) which without REMOTEFILES will expect it to exist in `/tmp/fio-data` it also cleans up the fio-data directory by copying the contents which may be jobs files out and then back in while removing any old graphs or output. If the user passes in REMOTEFILES it will be downloaded from the internet with wget before being used.

#!/bin/bash

[ -z "$JOBFILES" ] && echo "Need to set JOBFILES" && exit 1;
echo "Running $JOBFILES"

# We really want no old data in here except the fio script
mv /tmp/fio-data/*.fio /tmp/
rm -rf /tmp/fio-data/*
mv /tmp/*fio /tmp/fio-data/

if [ ! -z "$REMOTEFILES" ]; then
 # We really want no old data in here
 rm -rf /tmp/fio-data/*
 IFS=' '
 echo "Gathering remote files..."
 for file in $REMOTEFILES; do
   wget --directory-prefix=/tmp/fio-data/ "$file"
 done 
fi

fio $JOBFILES

There are two other Dockerfiles that are aimed at doing two other operations. 1. Producing graphs of the output data with fio2gnuplot and serving the graphs and output from a python SimpleHTTPServer on port 8000.

All Dockerfiles and examples can be found here (https://github.com/wallnerryan/fio-tools) and it also includes an All-In-One image that will run the job, generate the graphs and serve them all in one which is called fiotools-aio.

How to use it

  1. Build the images or use the public images
  2. Create a Fio Jobfile
  3. Run the fio-tool image
docker run -v /tmp/fio-data:/tmp/fio-data \
-e JOBFILES= \
wallnerryan/fio-tool

If your file is a remote raw text file, you can use REMOTEFILES

docker run -v /tmp/fio-data:/tmp/fio-data \
-e REMOTEFILES="http://url.com/.fio" \
-e JOBFILES= wallnerryan/fio-tool

Run the fio-genplots script

docker run -v /tmp/fio-data:/tmp/fio-data wallnerryan/fio-genplots \
<fio2gnuplot options>

Serve your Graph Images and Log Files

docker run -p 8000:8000 -d -v /tmp/fio-data:/tmp/fio-data \
wallnerryan/fio-plotserve

Easiest Way, run the “all in one” image. (Will auto produce IOPS and BW graphs and serve them)

docker run -p 8000:8000 -v /tmp/fio-data \
-e REMOTEFILES="http://url.com/.fio" \
-e JOBFILES=<your-fio-jobfile> \
-e PLOTNAME=MyTest \
-d --name MyFioTest wallnerryan/fiotools-aio

Other Examples

Important

  • Your fio job file should reference a mount or disk that you would like to run the job file against. In the job fil it will look something like: directory=/my/mounted/volume to test against docker volumes
  • If you want to run more than one all-in-one job, just use -v /tmp/fio-data instead of -v /tmp/fio-data:/tmp/fio-data This is only needed when you run the individual tool images separately

To use with docker and docker volumes

docker run \
-e REMOTEFILES="https://gist.githubusercontent.com/wallnerryan/fd0146ee3122278d7b5f/raw/cdd8de476abbecb5fb5c56239ab9b6eb3cec3ed5/job.fio" \
-v /tmp/fio-data:/tmp/fio-data \
--volume-driver flocker \
-v myvol1:/myvol \
-e JOBFILES=job.fio wallnerryan/fio-tool

To produce graphs, run the fio-genplots container with -t <name of your graph> -p <pattern of your log files>

Produce Bandwidth Graphs

docker run -v /tmp/fio-data:/tmp/fio-data wallnerryan/fio-genplots \
-t My16kAWSRandomReadTest -b -g -p *_bw*

Produce IOPS graphs

docker run -v /tmp/fio-data:/tmp/fio-data wallnerryan/fio-genplots \
-t My16kAWSRandomReadTest -i -g -p *_iops*

Simply serve them on port 8000

docker run -p 8000:8000 -d \
-v /tmp/fio-data:/tmp/fio-data \
wallnerryan/fio-plotserve

To use the all-in-one image

docker run \
-p 8000:8000 \
-v /tmp/fio-data \
-e REMOTEFILES="https://gist.githubusercontent.com/wallnerryan/fd0146ee3122278d7b5f/raw/006ff707bc1a4aae570b33f4f4cd7729f7d88f43/job.fio" \
-e JOBFILES=job.fio \
-e PLOTNAME=MyTest \
—volume-driver flocker \
-v myvol1:/myvol \
-d \
—name MyTest wallnerryan/fiotools-aio

To use with docker-machine/boot2docker/DockerForMac

You can use a remote fit configuration file using the REMOTEFILES env variable.

docker run \
-e REMOTEFILES="https://gist.githubusercontent.com/wallnerryan/fd0146ee3122278d7b5f/raw/d089b6321746fe2928ce3f89fe64b437d1f669df/job.fio" \
-e JOBFILES=job.fio \
-v /Users/wallnerryan/Desktop/fio:/tmp/fio-data \
wallnerryan/fio-tool

(or) If you have a directory that already has them in it. *NOTE*: you must be using a shared folder such as Docker > Preferences > File Sharing.

docker run -v /Users/wallnerryan/Desktop/fio:/tmp/fio-data \
-e JOBFILES=job.fio wallnerryan/fio-tool

To produce graphs, run the genplots container, -p

docker run \
-v /Users/wallnerryan/Desktop/fio:/tmp/fio-data wallnerryan/fio-genplots \
-t My16kAWSRandomReadTest -b -g -p *_bw*

Simply serve them on port 8000

docker run -v /Users/wallnerryan/Desktop/fio:/tmp/fio-data \
-d -p 8000:8000 wallnerryan/fio-plotserve

Notes

  • The fio-tools container will clean up the /tmp/fio-data volume by default when you re-run it.
  • If you want to save any data, copy this data out or save the files locally.

How to get graphs

  • When you serve on port 8000, you will have a list of all logs created and plots created, click on the .png files to see graph (see below for example screen)

687474703a2f2f692e696d6775722e636f6d2f6e6b73516b5a692e706e67


Testing and building with codefresh

As a side note, I recently added this repository to build on Codefresh. Right now, it builds the fiotools-aio Dockerfile  which I find most useful and moves on but it was an easy experience that I wanted to add to the end of this post.

Navigate to https://g.codefresh.io/repositories? or create a free account by logging into codefresh with your Github account. By logging in with Github it will have access to your repositories you gave access to and this is where the fio-tools images are.

I added the repository as a build and configured it like so.

screen-shot-2016-12-29-at-2-45-46-pm

This will automatically build my Dockerfile and run any integration tests and unit tests I may have configured in codefresh, thought right now I have none but will soon add some simple job to run against a file as an integration test with a codefresh composition.

Conclusion

I found over my time using both native linux tools and docker-based or containerized tools that there is need for both sometimes and in fact when testing container-native application workloads sometimes it is best to get metrics or benchmarks from the point of view of the application which is why we chose to run fio as a microservice itself.

Hopefully this was an enjoyable read and thanks for stopping by!

Ryan

Service Oriented Architecture vs Modern Microservices: Whats the difference?


Images thanks to http://martinfowler.com/articles/microservices.html and https://en.wikipedia.org/wiki/Service-oriented_architecture

I’ve been researching and working in the area of modern microservices for the past ~3 to 4 years and have always seen a strong relationship between Modern Microservices with tools and cultures like Docker and DevOps back to Service-Oriented Architecture (SOA) and design. I traced SOA roots back to Gartner Research in 1996 [2] or at least this is what I could find, feel free to correct me here if I haven’t pegged this. More importantly for this post I will briefly explore SOA concepts and design and how they relate to Modern Microservices.

Microservice Architectures (MSA) (credit to meetups and conversations with folks at meetups), are typically RESTful and based on HTTP/JSON. MSA is an architectural style not a “thing” to conform exactly to. In other words, I view it as more of a guideline. MSAs are derived from multiple code bases and each microservice (MS) has or can have its own language it’s written in. Because of this, MSAs typically have better readability and simpler deployments for each MS deployed which in turn leads to better release cycles as long as the organization surrounding the MS teams is put together effectively (more on that later). An MSA doesn’t NEED to be a polyglot of  but will often naturally become one because teams may be more familiar with one language over the other which helps delivery time especially if the interfaces between microservices are defined correctly, it truly doesn’t matter most of the time. It also enables scale at a finer level instead of worrying about the whole monolith which is more agile. Scaling a 100 lines of Golang that does one thing well can be achieved much easier when you dont have to worry about other parts of your application that dont need or you dont want to scale in the monolith. In most modern MSAs, the REST interfaces mentioned earlier can be considered the “contract” between microservices in an MSA. These contracts should self describing as they can be, meaning using formats like JSON which is human readable and well-organized.

Overall an MSA doesn’t just have technical benefits but could also mean fewer reviews and approvals because of smaller context boundaries for each microservice team. Better acquisition and on-boarding because you dont have to be so strict about language preference, instead of retooling, you can ingest using polyglot.

Motivations for SOA, from what I have learned, is typically business transformation oriented which shouldn’t be surprising. The enterprise based SOA transformation on a large budget but the motivation is different now with modern MSA, now its quick ROI and better technology to help scale using DevOps practices and platforms.

Some things to consider while designing your modern MSA that I’ve heard and stuck with me:

  • Do not create too many services/microservices
  • Try not to manage your own infrastructure if you can
  • Dont make too many dependencies, (e.g. 1 calls 2 calls 3 calls 4 calls 5 ……)
  • Circuit Breaker Pattern, a control point between microservices.
  • Bulkhead, do not allow 1 problem affect the entire boat, each microservice has its own data service / database / connection pool, 1 service does not take down the whole system or other microservices.
  • Chaos testing (Add it to your test suite!)  Example: Chaos Monkey
  • You can do microservices with or without service discovery / catalog. Does it over complicate things?

The referenced text[1] that I use for a comparison or similar concepts and differences in this post talk about a vast number of important topics related to Service-Oriented Architecture. Such topics include the overall challenges of SOA, service reuse, deployment efficiency, integration of application and data, agility, flexibility, alignment, reference architectures, common semantics, semantic pitfalls, legacy application integration, governance, security, service discovery, inventory and registration, best practices and more. This post does not go into depth of each individual part but instead this post aims at looking at some of the similarities and differences of SOA and modern microservices.

Service-Oriented Architecture:

Some of concepts of SOA that I’d like to mention (not fully encompassing):

  • Technologies widely used were SOAP, XML, WSDL, XSD and lots of Java
  • SOAs typically had a Service Bus or ESB (Enterprise Service Bus) a complex middleware aimed at providing access and masking of interfaces.
  • Identification and Inventory
  • Value chain and business model is more about changing the entire business process

Modern Microservces:

  • Technologies widely used are JSON, REST/HTTP and Polyglot services.
  • Communication is done over HTTP and the interfaces are abstracted using RESTful contracts.
  • Service Discovery
  • Value chain and business model is about efficiencies, small teams and DevOps practices while eliminating cilos.
The Bulkhead Analogy

I want to spend a little bit of time on one of the analogies that stuck with me about modern microservices. This was the Bulkhead analogy which I cannot for the life of me remember where I heard it or seem to google a successful author so credit to who or whom ever you are.

The bulkhead analogy is pretty simple actually but has a powerful statement for microservice design. The analogy is such that a MSA, like a large ship is made up of many containers (or in the ships case, bulkheads) that have boundaries between them and hold different component of the ships such as engines, cargo, pumps etc. In MSA, these containers hold different functions or processes that do something wether its handle auth requests, connection to a DB, service a lookup or transformation mechanism it doesn’t matter, just that in both cases you want all containers to be un-damaged for everything to be running the best it can.

The bulkhead analogy goes further to say that if a container gets damaged and takes on water then the entire ship should not sink due to one or few failures. In MSA this can be applied by saying that a few broken microservices should not be designed in a way where there failure would take down your entire application or business process. It essence designs the bulkheads or containers to take damage and remain afloat or “running”.

Again, this analogy is quite simple, but when designing your MSA it’s important to think about these details and is why doing things like proper RESTful design and Chaos testing is worth your time in the long run.

Similarities and Differences or the two architectures / architecture styles:

Given the little glimpse of information I’ve provided above about service oriented architectures and microservices architectures I want to spend a little time talking about the obvious similarities and differences.

Similarities

Both SOA and MSA do the following:

  • Code or service reuse
  • Loose coupling of services
  • Extensibility of the system as a whole
  • Well-defined, self-contained services or functions that overall help the business process or system
  • Services Registries/Catalogs to discover services

Differences

Some of the differences that stick out to me are:

  • Focus on business process, instead of the focus of many services making one important business process MSA focuses on allowing one thing (containerized process) to do one thing and do it well. This allows tighter context boundaries for microservices.
  • SOA tailors towards SOAP, XML, WSDL while MSA favors JSON, REST and Polyglot. This is one of the major differences to me, even though its just a tech difference this RESTful polyglot paradigm enables MSAs to thrive with todays developers.
  • The value chain and business model is more DevOps centric allowing the focus to be on loosely coupled teams that break down cilos and can focus on faster release cycles and CI/CD of their services rather than with SOA teams typically still had one monolithic view of the ESB and services without the DevOps focus.

Conclusion

Overall this post was mainly a complete high-level overview of what I think are some of the concepts and major differences between traditional SOA and Modern Microservices that stemmed from a course I took during my masters that explored SOA while I was in the industry working on Microservices. The main point I would say I have is that SOA and MSA are very similar but MSA being SOA’s offspring in a way using modern tooling and architecture approaches to todays scaleable data center.

Note* by no means did I cover SOA or MSA to do them any real justice, so I suggest looking into some of the topics talked about here or reading through some of the references below if your interested.

Cheers!

[1] Rosen, Michael “Applied SOA: Service-Oriented Design Architecture and Design Strategies”  Wiley, Publishing Inc. 2008

[2] Gartner Research “Service Oriented” Architectures, Part 1:” – //www.gartner.com/doc/code/29201

[3] “SOA fundamentals in a nutshell” Aka Sniv February 2015 http://www.ibm.com/developerworks/webservices/tutorials/ws-soa-ibmcertified/ws-soa-ibmcertified.html

Container Data Management and Production Use-cases

voting-logo

In my last few jobs I have had the pleasure to work on three main focus areas, Software Defined Networking, OpenStack, and Linux Containers. More recently I have been focused on container data management and what it means for persistence and data management to be a first class citizen to containerized applications and microservices. This has done a few things for me, give me an opportunity to work on interesting (and hard) problems, hack, create and apply new solutions and technologies into proof of concept and production environments. In my current role as a Technical Evangelist at ClusterHQ we have been hard at work continuing the Flocker project, creating the Volume Hub and spinning out dvol (git workflows for Docker volumes / data). All of this is aimed at one major thing, helping your team move from development on your laptop to test and Q/A and finally into production seamlessly with persistence.

We’re just at the beginning of the container and data revolution and if your interested in learning more about some of these topics, click the links below and vote for some upcoming talks at OpenStack Austin 2016.

Three Critical Concepts for Containerized Storage Management

https://www.openstack.org/summit/austin-2016/vote-for-speakers/presentation/8506

Lessons learned running database containers on OpenStack

https://www.openstack.org/summit/austin-2016/vote-for-speakers/presentation/8501

A special shoutout to Andrew Sullivan and Sumit Kumar for their CFP on “Data Mobility for Docker containers with Flocker”! Please help them spread the word on stateful containers by voting for their talk as well! https://www.openstack.org/summit/austin-2016/vote-for-speakers/presentation/7859

Cheers!

Ryan – @RyanWallner

Migrating the monolith from EC2 to an ECS-based multi-service Docker app


On my spare time I run a website for a tax accounting company. This monolithic app is a largely stateless app (not really but we don’t need persistent stores/volumes), uses one of the best online tax software, and uses ruby on rails and runs on an EC2 instance with Apache and MySQL Server and Client installed. This is what is referenced as a “monolithic app” because all components are installed on 1 single VM. This makes the application more complicated to edit, patch, update etc (even though it barely ever needs to updated apart from making sure the current year’s Tax information and links are updated.) If we want to migrate to a new version of the database or newer version of rails, things are not isolated and can overlap. Now, RVM and other mechanisms can be used to do this, but by using Docker to isolate components and Amazon ECS to deploy the app, we can rapidly develop, and push changes into production in a fraction of the time we used to. This blog post will go through the experience of migrating that “Monolithic” ruby on rails app and converting it into a 2 service Docker application that can be deployed to Amazon ECS using Docker Compose.

First things first:

The first thing I did was ssh into my EC2 instance and figure out what dependencies I had. The following approach was taken to figure this out:

  • Use lsb_release -a to see what OS and release we’re using.
  • Look at installed packages via “dpkg” / “apt
  • Look at installed Gems used in the Ruby on Rails app, take a peek at Gemfile.lock for this.
  • View the history of commands via “history” see any voodoo magic I may have done and forgot about 🙂
  • View running processes via “ps [options]” which helped me remember what all is running for this app. E.g. Apache2, MySQL or Postgres, etc.

This gives us a bare minimum of what we need to think about for breaking our small monolith into separate services, at-least from a main “component” viewpoint (e.g. Database and Rails App). It’s more complicated to try and figure out how we can carve up the actual Ra
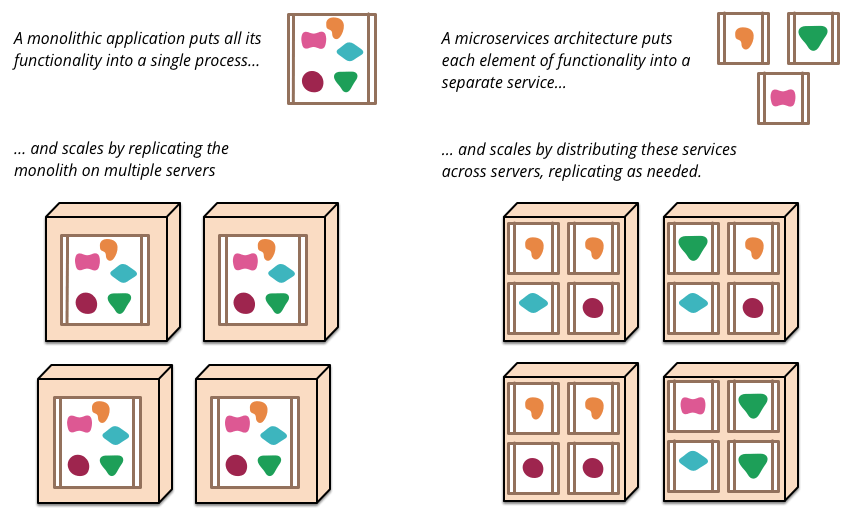
ils / Ruby code to implement smaller services that make up the site, and in some cases this is where we can go wrong, if it works, don’t break it. Other times, go ahead, break out smaller services and deploy them, but start small, think of it like the process of an amoeba splitting 🙂

We can now move into thinking about the “design” of the app as it applies to microservices and docker containers. Read the next section for more details.

Playing with Legos:

As it was, we had apache server, rails, and mysql all running in the same VM. To move this into an architecture which uses containers, we need to separate some of these services into separate building blocks or “legos” which you could think of as connecting individual legos together to build a single service or app. SOA terms calls this “Composite Apps” which are similar in thinking, less in technology. We’ll keep this simple as stated above and we’re going to break our app into 2 pieces, a MySQL database container and a “Ruby on Rails” container running our app.

Database Container

First, we’ll take a look at how we connect the database with rails. typically in Rails, a connection to a database is configured in a database.yml file and looks something like this. (or something like this)

    development:
        adapter: mysql
        database: AppName_development
        username: root
        password:
        host: localhost
    test:
        adapter: mysql
        database: AppName_test
        username: root
        password:
        host: localhost
    production:
        adapter: mysql
        database: AppName_production
        username: root
        password:
        host: localhost

Now, since we can deploy a MySQL container with Docker using something like the following:

docker run -d --name appname_db -e MYSQL_ROOT_PASSWORD=<password> mysql

We need a way to let our application know where this container lives (ip address) and how to connect to it (tcp?, username/password, etc). We’re in luck, with docker we can use the –link (read here for more information on how –link works) flag when spinning up our Rails app and this will inject some very useful environment variables into our app so we can reference them when our application starts. By assuming we will use the –link flag and we link our database container with the alias “appdb” (more on this later) we can change our database.yml file to look something like the following (Test/Prod config left out on purpose, see the rest here)

development:
 adapter: mysql2
 encoding: utf8
 reconnect: false
 database: appdb_dev
 pool: 5
 username: root
 password: <%= ENV['APPDB_ENV_MYSQL_ROOT_PASSWORD'] %>
 host: <%= ENV['APPDB_PORT_3306_TCP_ADDR'] %>
 port: <%= ENV['APPDB_PORT_3306_TCP_PORT'] %>
Rails Container

For the ruby on rails container we can now deploy it making sure we adhere to our dynamic database information like this. Notice how we “link” this container to our “appname_db” container we ran above.

docker run -d --link appname_db:appdb -p 80:3000 --name appname wallnerryan/appname

We also map a port to 3000 because we’re running our ruby on rails application using rails server on port 3000.

Wait, let’s back track and see what we did to “containerize” our ruby on rails app. I had to show the database and configuration first so that once you see how it’s deployed it all connects, but now let’s focus on what’s actually running in the rails container now that we know it will connect to our database.

The first thing we needed to do to containerize our rails container was to create an image based on the rails implementation we had developed for ruby 1.8.7 and rails 3.2.8. These are fairly older version of the two and we had deployed on EC2 on ubuntu, so in the future we can try and use the Ruby base image but instead we will use the ubuntu:12.04 base image because this is the path of least resistance, even though we can reduce our total image size with the prior. (more about squashing our image size later in the post)

Doing this we can create Dockerfile that looks like the following. To see the code, look here We actually don’t need all these packages (I dont think) but I haven’t got around to reducing this to bare minimum by removing one by one and seeing what breaks. (This is actually easy and a fun way to get your container just right because we’re using docker, and things build and run so quickly)

Screen Shot 2015-10-15 at 5.04.06 PM

As you can see we use “FROM ubuntu:12.04” to denote the base image and then we continue to install packages, COPY the app, make sure “bundler” is installed and install using the bundler the dependencies. After this we set the RAILS_ENV to use “production” and rake the assets. (We cannot rake with “db:create” because the DB does not exist at docker build time, more on this in runtime dependencies) Then we throw our init script into the container, chmod it and set it as the CMD used when the container is run via Docker run. (If some of this didn’t make sense, please take the time to run over to the Docker Docs and play with Docker a little bit. )

Great, now we have a rails application container, but a little more detail on the init script and runtime dependencies before we run this. See the below section.

Runtime dependencies:

There are a few runtime dependencies we need to be aware of when running the app in this manner, the first is that we cannot “rake db:create” until we know the database is actually running and can be connected to. So in order to make this happen at runtime we place this inside the init script.

The other portion of the runtime dependencies is to make sure that “rake db:create” does not fire off before the database is initialized and ready to use. We will use Docker Compose to deploy this app and while compose allows us to supply dependencies in the form of links there no real control over this if A) they aren’t linked, and B) if there is a time sequence needed. In this case it takes the MySQL container about 10 seconds to initialize so we need to put a “sleep 15” in our init script before firing off “rake db:create” and then running the server.

In the below script you can see how this is implemented.

Screen Shot 2015-10-15 at 5.14.19 PM

Nothing special, but this ensures our app runs smoothly every time.

Running the application

We can run the app a few different ways, below we can see via Docker CLI and via Docker Compose.

Docker CLI
docker run -d --name appname_db -e MYSQL_ROOT_PASSWORD=root mysql
docker run -d --link appname_db:appdb -p 3000:3000 --name appname app_image
Docker Compose

With compose we can create a docker-comose.yml like the following.

app:
 image: wallnerryan/app
 cpu_shares: 100
 mem_limit: 117964800
 ports:
 - "80:3000"
 links:
 - app_mysql:appdb

app_mysql:
 image: mysql
 cpu_shares: 100
 mem_limit: 117964800
 environment:
 MYSQL_ROOT_PASSWORD: XXXXXX

Then run “docker compose up

Running the app in ECS and moving DNS:

We can run this in Amazon ECS (Elastic Container Service) as well, using the same images and docker compose file we just created. If you’re unfamiliar with EC2 or the Container Service, check out the getting started guide.

First you will need the ecs cli installed, and the first command will be to setup the credentials and the ECS cluster name.

ecs-cli configure --region us-east-1 --access-key <XXXXX> --secret-key <XXXXXXXXX> --cluster ecs-cli-dev

Next, you will want to create the cluster. We only create a cluster of size=1 because we don’t need multiple nodes for failover and we aren’t running a load balancer for scale in this example, but these are all very good ideas to implement for your actual microservice application in production so you do not need to update your domain to point to different ECS cluster instances when your microservices application moves around.

ecs-cli up --keypair keypair-name --capability-iam --size 1 --instance-type t2.micro

After this, we can send our docker compose YAML file to ecs-cli to deploy our app.

ecs-cli compose --file docker-compose.yml up

To see the running app, run the following command.

ecs-cli ps

NOTE: When migrating this from EC2 make sure and update the DNS Zone File of your domain name to point at the ECS Cluster Instance.  

Finally, now that the application is running

Let’s back track and squash our image size for the rails app.

There are a number of different ways we can go about shrinking our application such as a different base image, removing unneeded libraries, running apt-get remove and autoclean and a number of others. Some of these taking more effort than others, such as if we change the base image, we would need to make sure our Dockerfile still installs the needed version of gems, and we can alternatively use a ruby base image but the ones I looked at don’t go back to 1.8.7.

The method we use as a “quick squash” is to export, and import the docker image and re-label it, this will squash out images into one single image and re-import the image.

docker export 7c7e6a6fff3b | docker import - wallnerryan/appname:imported

As you can see, this squashed our image down from 256MB to 184MB, not bad for something so simple. Now I can do more, but this image size for my needs is plenty small. Here is a good post from Brian DeHamer on some other things to consider when optimizing image sizes. Below you can see the snapshot of the docker image (taxmatters is the name of the company, I have been substituting this with “appname” in the examples above).

Screen Shot 2015-10-14 at 1.54.42 PM

Development workflow going forward:

So after we finished migrating to a Docker/ECS based deployment it is very easy to make changes, test in either a ECS development cluster or using Local Docker Machine, then deploy to the production closer on ECS when everything checks out. We could also imagine code changes automated in a CI pipeline where a CI pipeline kicks off lambda deployments to development after initial smoke tests triggered by git push, but we’ll leave that for “next steps” :).

Thanks for reading, cheers!

Ryan

A breakdown of layers and tools within the container and microservices ecosystem

I wrote a post not to long ago about creating a microservices architecture from scratch as part of series I am doing on modern microservices. Some colleagues and friends of mine suggested I break a portion of that post out into its own so I can continue to update it as the ecosystem grows. This is an attempt to do so. The portion they were talking about was the breakdown of layer and tools within MSA in my post here which laid the initial pass at this. This post will try and fill these layers out and and continue to add to them, there is just no way I can touch every single tool or definition correctly as I see them so please take this as my opinion based on the experience I have had in this ecosystem and please comment with additions, corrections, comments etc.

  • Applications / Frameworks / App Manifests
  • Scheduling / Scaling
  • Management Orchestration
  • Monitoring (including Health) / Logging / Auditing
  • Runtime Build/Creation (think build-packs and runtimes like rkt and docker)
  • Networking / Load Balancing
  • Service Discovery / Registration
  • Cluster Management / Distributed Systems State
  • Container OS’s
  • Data Services, Data Intelligence, and Storage Pools

To give you an idea of the tools available and technologies that fall into these categories, here is the list again, but with some of the tools and technologies in the ecosystem added. *Keep in mind this is is probably not an exhaustive list, if you see a missing layer or tool please comment!

*Note: Some of these may seem to overlap, if I put Kubernetes under Orchestration, it could easily fit into Cluster Management, or Scheduling because of its underlying technologies, however this is meant to label something with it’s overall “feel” for how to ecosystem views the tool(s), but some tools may appear in more than one section. I will labels these (overlap)

*Note: I will continue to add links as I continue to update the breakdown*

Again, if you see a missing layer or tool (which I’m sure I am) please comment!

Cheers.

Microservices: An architecture from scratch using Docker, Swarm, Compose, Consul, Facter and Flocker

compose consul docker flocker puppet swarm

You might be asking yourself about the information going around about microservices, containers, and the many different tools around building a flexible architecture or “made-of-many-parts” architecture. Well you’re not alone, and there are many tools out there helping (or confusing) you to do so. In this post I’ll talk about some of the different options available like Mesos, Docker Engine, Docker Swarm, Consul, Plugins and more out there. The various different layers involved in a modern microservices architecture have various responsibilities and deciding how you can go about choosing the right pieces to build out those layers can be tough. This post is by far not the only way you can put the layers together and in fact this is MY opinion on the subject given the experience I have had in the ecosystem, it also does not reflect ideas of my employer.

Typically I define modern microservices architecture as having the following layers and responsibilities:

  • Applications / Frameworks / App Manifests
  • Scheduling
  • Orchestration
  • Monitoring / Logging / Auditing
  • Service Discovery
  • Cluster Management / Distributed Systems State
  • Data Services and Intelligence

To give you an idea of the tools available and technologies that fall into these categories, here is the list again, but with some of the projects, products and technologies in the ecosystem added. keep in mind this is not an exhaustive list.

*UPDATE: here is separate post aimed at making this a more exhaustive list

So lets choose a few components, we choose components apart from networking which we leave out here and just use host-only networking with vagrant, but we could add in libnetwork support in Docker directly. For logging and monitoring, we also just spin up DockerUI for this but could also add in loggly, fluentd, sysdig and others.

  • Consul – Service Discovery, DNS, K/V Storage
  • Docker Engine (Runtime)
  • Docker Swarm (Scheduler / Cluster / Distributed State )
  • Docker Compose (Orchestration)
  • Docker Plugins (Volume integration)
  • Flocker (Data Services / Orchestration)

So what do these layers look like all together? We can represent the layers I mentioned above the the following way, including the applications as a logical mapping to the containers running programs and processes above.

microservicesblock

Above, we can put together a microservices architecture with the tools defined above, atop of this we can create applications from manifests and schedule containers onto the architecture once this is all running. I want to pinpoint a few specific areas in this architecture because we can add some extra logic to this to make things a little more interesting.

Service Discovery and Registration:

The registration layer can serve many purposes, it is mostly used to register and allow discovery of services (microservices/containers) that are running on a system/cluster. We can use consul to do this type of registration within its key / value mechanisms. You can use Consul’s built-in service mechanism or there are other ways to talk to consul key/value like registrator. In our example we can use the registry layer for something a little more interesting, in this case we can use consul’s locking mechanisms to lock resources we put in them, allowing schedulers to tap into the registry layer instead of talking to every node in the cluster for updates on CPU, Memory etc.

We can add resource updating scripts to our consul services by adding a service to consul’s service mechanism, these services will import keys and values from Facter and other resources then upload them to the K/V store, consul will also health check these services for us as a added benefit.

Below we can see how Consul registers services, in this case we register an “update service” which updates system resources into the registry layer.

consul-service

We now have the ability to add many system resources, but we also have the flexibility to upload custom resources (facts) like system overload and memory swap free, the below “fact” is a sample of how we can do so giving us a system overload.

custom_fact

Doing so, we can enable the swarm scheduler to use them for scheduling containers. Swarm does not do this today, instead it has only static labels added when the docker engine is started, in this example our swarm scheduler utilizes dynamic labels by getting up-to-date realtime labels that mean something to the system which allows us to schedule containers a little better. What this looks like in swarm is below. See “how to use” section below for how this actually gets used.

swarm info

Data Services Layer:

Docker also allows us to plug into its ecosystem for volumes with volume plugins which enable containers to add data services like RexRay and Flocker. This part of the ecosystem is rapidly expanding and today we can provision fairly basic volumes with a size, and basic attributes. Docker 1.9 has a volume API which introduces options (opts) for more advanced features and metadata passed to data systems. As you will see in the usage examples below, this helps with more interesting workflows for the developer, tester, etc. As a note, the ecosystem around containers will continue to grow fast, use cases around different types of applications with more data needs will help drive this part of ecosystem.

If your wondering what the block diagram may actually looks like on a per node (server/vm) basis, with what services installed where etc, look no more, see below.

ms1

From the above picture, you should get a good idea of what tools sit where, and where they need to be installed. First, every server participating in the cluster needs a Swarm Agent, Flocker-Dataset-Agent, Docker Plugin for Docker, A Consul server (or agent depending how big the cluster, at least 3 servers), and a Docker Engine. The components we talked about above like the custom resource registration has custom facter facts on each node as well so consul and facter can import them appropriately. Now, setting this up by hand is sure to be a pain in the a** if your cluster is large, so in reality we should think about the DevOps pipeline and the roll of puppet, or chef to automate the deployment of a lot of this. For my example I packed everything into a Vagrantfile and vagrant shell scripts to do the install and configuration, so a simple “vagrant up” would do, given I have about 20-30 minutes to watch the cluster come up 🙂

How do I use it!!?

Okay, lets get to actually using this microservices cluster now that we have it all set. This section of the blog post should give you an idea of the use cases and types of applications you can deploy to your microservices architecture and what tooling to use given then above examples and layers we introduced.

Using the Docker CLI with Swarm to schedule new resources via constraints and volume profiles.

This will look for specific load between 0-25% because we have a custom registration layer. *(note, some of the profiles work was in collaboration Mahuri from CHQ and Sean Dell for the Docker Global Hackday #3)

docker run -d -e constraint:system_overload_10min==/[0-2][0-5]/ -e constraint:architecture==x86_64 -e constraint:virtual=virtualbox -e constraint:selinux_enforced=false -v myVol@gold:/data/ redis

Using Docker Compose with Flocker volume driver that supports storage profiles:

This will schedule a redis database container using the flocker volume driver with a “gold” volume, meaning we will get a better IOPS, Bandwidth and other “features” that are considered of more performance and value.

Screen Shot 2015-10-01 at 2.24.40 PM

Using Docker compose with swarm to guarantee a server has a specific volume driver and to schedule a container to a server with a specific CPU Overload:

In this example we also use the overload percentage resource in the scheduler but we also take advantage of the registry layer knowing which nodes are running certain volume plugins and we can schedule to Swarm knowing we will get nodes with a specific driver and hypervisor making sure that it will support the profile we want.

Screen Shot 2015-10-01 at 2.25.34 PM

A use case where a developer wants to schedule to specific resources, start a web service, snapshot an entire database container and its data and view that data all using the Docker CLI.

This example shows how providing the right infrastructure tooling to the Docker CLI and tools allows for a more seamless developer / test workflow. This example allows us to get everything we need via the docker CLI while never leaving our one terminal to run commands on a storage system or separate node.

Start MySQL Container with constraints:

docker run -ti -e constraint:is_virtual==True -e constraint:system_overload_10min==/[0-2][0-5]/ -v demoVol@gold:/var/lib/mysql --volume-driver=flocker -p 3306:3306 --name MySQL wallnerryan/mysql
Start a simple TODO List application:

docker run -it -e constraint:is_virtual==True --rm -e DATABASE_IP=192.168.50.13 -e DATABASE=mysql -p 8005:8080 wallnerryan/todolist
We want to snapshot our original MySQL database, so lets pull the dataset-ID from its mount point and input that into the snapshot profile.

docker inspect --format='{{.Mounts}}' MySQL
[{demoVol@gold /flocker/f23ca986-cb43-43c1-865c-b57b1023ab7e /var/lib/mysql flocker z true}]
Here we place a substring of the the Dataset ID into the snapshot profile in our MySQL-snap container creation, this will create a second MySQL container with a snapshot of production data.

docker run -ti -e affinity:container==MySQL -v demoVol-snap@snapshot-f23ca986:/var/lib/mysql --volume-driver=flocker -p 3307:3306 --name MySQL-snap wallnerryan/mysql

At this point we have pretty much been able to snapshot the entire MySQL application (container and data) and all of its data at a point in time while scheduling the point in time data and container to a specific node in one terminal and few CLI commands where our other MySQL database was running. In the future we could see the option to have dev/test clusters and have the ability to schedule different operations and workflows across shared production data in a microservices architecture that would help streamline teams in an organization.

Cheers, Thanks for reading!

What Would Microservices do!?

Image Credit for the Googling of images

Private/Public IaaS, and PaaS environments are some of the fastest moving technology domains of their kind right now. I give credit to the speed of change and adoption to the communities that surround them, open-source or within the enterprise. As someone who is in the enterprise but contributes to open-source, it is surprising to many to find out that within the enterprise there is a whole separate community around these technologies that is thriving. That being said, I have been working with os-level virtualization technologies now for the past (almost) 3 years and in the past 2 years most people are familiar with the “Docker-boom” and now with the resurgence or SoA/Microservices I think its worth while exploring what modern technologies are involved, what drivers for change and how it affects applications and your business alike.

Containers and Microservices are compelling technologies and architectures, however, exposing the benefits and understanding where they come from is a harder subject to catch onto. Deciding to create a microservice architecture for your business application or understanding which contexts are bound to which functionality can seems like the complexity isn’t worth it in the long wrong. So here I explore some of the knowledge of microservices that is already out there in understanding when and why to turn to microservices and figuring out why, as in many cases, there really isn’t a need to.

In this post I will hopefully talk about some of major drivers and topics of microservices and how I see them in relationship to data-center technologies and applications. These are my own words and solely my opinion, however I hope this post can help those to understand this space a little better. I will talk briefly about, Conway’s Law, what it means to Break Down the Silos, why it is important to Continuous delivery, the importance of the unix philosophy, how to define a microservice, their relationship to SOA, the complexity involved in the architecture, what changes in the organization must happen, what companies and products are involved int this space, how to write a microservice, the importance of APIs and service discovery, and layers of persistence.

Microservices

The best definition in my opinion is “A Microservice fits in your head”. There are other definitions involving an amount of pizza, or a specific amount for lines of code, but I don’t like putting these boundaries on what a microservices is. In the simplest, a microservice is something that is small enough to conceptually fit in your head without really having to think to much about it. You can argue about how much someone can fit in their head etc, but then thats just rubbish and un-important to me.

I like to bring up the unix principle here as ice heard from folks at Joyent and other inn he field, this is the design that programs are designed to do one thing and do that one thing well. Like “ls” or “cat” for instance, typically if you design a microservice this way, you can limit its internal failure domain because it does one thing and exposes and API to do so. Now, microservices is a loaded term, and just like SoA there are similarities in these two architectures. But they are just that, architectures and I will add that you can find similarities in many of their parts but the some of the main differences is that SoA used XML, SOAP, typically a Single Message Bus for communication and a shared data source for services. Microservices uses more modern lightweight protocols like RESTful APIs, JSON, HTTP, RPC and typically a single microservice is attached to its own data source, whether is a copy, shard or a its own distributed database. This helps with multi-tenancy, flexibility and context boundaries that help scale such an architecture like microservices. One of the first things people start to realize when deep divining into microservices is the amount of complexity that comes out of slicing up the monolith because inherently you need to orchestrate, monitor, audit, and log many more processes, containers, services etc than you did with a typical monolithic application. The fact that these architectures are much more “elastic and ephemeral” than others forces technical changes that center around the smallest unit of business logic that helps deliver business value when combine with other services to deliver the end goal. This way each smaller unit can have its own change lifecycle, scale independently and be developed free of other dependencies within the typical monolith.

This drives the necessity to adopt a DevOps culture and change organizationally as each service should be developed by independent, smaller teams that can each release code within their own cycles. Teams still need to adhere to the invisible contracts that are between the services, these contracts are the APIs themselves between the services which talk to one another. I could spend an entire post on this topic but there is a great book called “Migrating to Cloud-Native Application Architectures” by Matt Stine of Pivotal (Which is free, download here) that talks about organizational changes, api-based collaboration, microservices and more. There is also a great post by Martin Fowler (here) that talks about microservices and the way Conways law affects the organization.

Importance of APIs

I want to briefly talk about the importance of orchestration, choreography and the important of the APIs that exist within a microservices architecture. A small note on choreography, this is another terms that may be new but its related to orchestration. Choreography is orchestration turned on its head, instead of an orchestration unit signaling when things happen, the intelligence is pushed to the endpoints and those endpoints react to events of changing environments, therefore each service known its own job. A great comparison of this is (here) in the book “Building Microservices” by Sam Newman. Rest APIs are at the heart of this communication, if an event is received from a customer of user, a choreography chain is then initialized and each endpoint talks to each other via these APIs, therefore, these APIs must remain robust, backward compatible and act as contracts between how services interact. A great post of the Netflix microservices work (here) explains this in a little more detail.

If the last few paragraphs and resources make some sense, you end up with a combination of loosely coupled services, strict boundaries, APIs (contracts), robust choreography and vital health and monitoring for all services deployed. These services can be scaled, monitored and moved independently without risk and react well to failures. Some of the exa plea of tools to hel you do this can be found at http://netflix.github.io. This all sounds great, but without taking the approach of “design for the integrations not the infrastructure/platform” (which I’ve heard a lot but can’t quite figure out who the quote belongs to, coudos to who you are :] ) this can fail pretty easily. There is a lot of detail I didnt cover in the above and I suggest looking into the sources I listed for a start on getting into the details of each part. For now I am going to turn to a few topics within microservices, Service Discovery & Registration and Data Persistence layers in the stack.

Service Discovery and Registration

Distributed systems at scale using microservices need a way to registry and discover what services and endpoints are available, enter Service Discovery tools like Consul, Etcd, Zookeepr, Eureka, and Doozerd. (others not listed) These tools make it easy for services to call this layer and find out a way to consume what else is available. Typically this helps one service find out how to connect and use another service. There are three main processes IMO for applications to use this layer:

  • Registration
    • when a service gets installed or “comes up” it needs to initially be registered with the discovery layer. An example of this is Registrator (https://github.com/gliderlabs/registrator) which reacts to docker containers starting and sends key/value pairs of data to a tool like Consul or Etcd to keep current discovery data about the service. Such information could be IP Endpoint, Port, API URL/Path, Resources, etc that can be used by the service.
  • Discovery
    • Discovery is the other end of Registration, when a service wants to use a (for instance) “proxy”, how will it know where the proxy lives or how to access it? Typically in applications this information is in a configuration file or hard coded into the app, whith service discovery all the app needs to do is know how to implement the information owned by the registration mechanism. For instance, an app can start and immediately say “Where is ‘Proxy'” and the discovery mechanism can respond by saying “Here is the Proxy thats closest to you” or “Here is the first Proxy available” along with the IP and Port of that proxy, the app can then just use those values, typically given in JSON or XML and use them inside the application thus not ever hardcoding any configuration anywhere.
  • Consume
    • Last but smallest is when the applications received the response back from the discovery mechanism it must know how to process and the the data. E.g. if your asking for a proxy or asking for a database the information given back would be different for the proxy versus how you would actually access the database.

Persistence and Backing Services

Today most applications are stateless applications, which means that they do not own any persistence themselves. You can think of a stateless application as a web-server, this web-server processes requests and talks to a database, but the database is another microsevice and this is where all the state lives. We can scale the web-server as much as we want and even actively load balance those endpoints without ever worrying about any state. However, that database I mentioned in the above example is something we should worry about, because we want our data to be available, and protected at all times. Though, you can’t (today) spin up your entire application stack (e.g. MongoDB, Express.js, Angular.js and Node.js) all in different services (containers) and not worry about how your data is stored, if you do this today you need persistent volumes that can be flexible enough to move with your apps container, which is hard to do today, the data container is just not as flexible as we need it be in todays architectures like Mesos and Cloud Foundry. Today persistence is added via Backing Services (http://12factor.net/backing-services) which are persistence / data layers that exist outside of the normal application lifecycle. This mean that in order to use a database one must first create the backing service then bind it to the application. Cloud Foundry does this today via “cf create-service and cf bind-service APPLICATION SERVICE_INSTANCE” where SERVICE_INSTANCE is the backing store, you can see more about that here. I won’t dig into this anymore other to say that this is problem that needs to be solved, and making your data services as flexible as the rest of your microservices architecture is not easy feat. The below link is a great article by Luke Marsden of ClusterHQ that talks about this very issue. http://www.infoq.com/articles/microservices-revolution

I also wanted to mention an interesting note on persistence in the way Netflix deploys Cassandra. All the data that Netflix uses is deployed on Amazon on EC2 instance and they use ephemeral storage! Which means when the node dies all their data is gone. But alas! they don’t worry about this type of issue anymore because Cassandra’s distributed, self healing architecture allows Netflix to move around their persistence layers and automatically scale them out when needed. I found out they do run incremental backups to S3 by briefly speaking with Adrian Cockcroft at offices hours at the Oreilly Software Architecture conference. I found this to be a pretty interesting point to how Netflix runs its operations for its data layers with Cassandra showing that these cloud-native, flexible, and de-coupled applications are actually working in production and remain reliable and resilient.

Major Players

Some of the major players in the field today include: (I may have missed some)

  • Pivotal
  • Apache Mesos
  • Joyent (Manta)
  • IBM Bluemix
  • Cloud Foundry
  • Amazon Elastic Container Service
  • Openshift by RedHat
  • OpenStack Magnum
  • CoreOS (with Kubernetes) see (Project Tectonic)
  • Docker (and Assorted Tools/Binaries)
  • Cononical’s LXD
  • Tutum
  • Giant Swarm

There are many other open source tools at work like Docker Swarm, Consul, Registrator, Powerstrip, Socketplane.io (Now owned by Docker Inc), Docker Compose, Fleet, Weave. Flocker and many more. This is just a token to how this field of technology is booming and were going to see many fast changes in the near future. Its clear that future importance of deploying a service and not caring about the “right layers” or infrastructure will be key. Enabling data flexibility without tight couplings to the service is part of an the overall application design or the data service. These architectures can be powerful for your applications and for your data itself. Ecosystems and communities alike are clearly coming together to help and try to solve problems for these architectures, I’m sure some things are coming so keep posted.

Microservices on your laptop

One way to get some experience with these tools is to run some examples on your laptop, checkout Lattice (https://github.com/cloudfoundry-incubator/lattice/) from Cloud Foundry which allows you to run some microservice-like containerized workloads. This post is more about the high-level thinking, and I hope to have some more technical posts about some of the technologies like Lattice, Swarm, Registrator and others in the future.

Continuous Delivery Workflow with Tutum, Docker, Jenkins, and Github

https://wiki.jenkins-ci.org/download/attachments/65671116/jenkins-stickers.png?version=1&modificationDate=1360595834000http://www.molecularecologist.com/wp-content/uploads/2013/11/github-logo.jpghttps://i.vimeocdn.com/video/472622365_640.jpg

Continuos Integration

Recently I have been playing with a way to easily setup build automation for many small projects Continuos Delivery workflows are perfect for the smaller projects I have so settings up test / build automation is super useful and is even better when it can be spun up for a new project in a matter of minutes so I decides to work with Tutum to run docker-based Jenkins that connects into Github repositories.

In this post I explore setting up continuous integration using the Tutum.co platform using amazon AWS, a Jenkins Docker image, and a simple repository that have a C program that calculates primes numbers as an example of automating the build process when a new push happens to Github.

What I haven’t done for the post is explore using a jenkins slave as a docker engine, but hopefully in the future I can update some experiences I have had doing so which basically allows me to have custom build environments by publishing specialized docker images as what Jenkins creates and builds within. This can be helpful if you have many different projects and need specialized build environments for continuos integration.

Tutum, Docker and Jenkins

What I did first was setup a Tutum account, which was really simple. Just go to https://dashboard.tutum.co/accounts/login and sign in or create an account, I just used my github account and it got me going really quickly. Tutum has a notion of Stacks, Services and Nodes.

Node

A node is an agent for your service to run on. This can be a VM from Amazon, Digital Ocean, Microsoft Azure, or IBM Softlayer. You can also “bring your own” node by making a host publicly reachable and running the Tutum Agent on it.

Service

A service is a container, running some process(s)

Stack

A stack is a collection of Services that can be deployed together. You can use a tutum.yml file which looks and feels just like a Docker Compose yml file to deploy multiple services.

Deploy Jenkins

To deploy Jenkins you must first create a Node, then head to Services and click “create service” Jenkins will be our service.

Screen Shot 2015-03-24 at 10.08.23 PM

We can search the Docker Hub for Jenkins images, I’ll choose aespinosa/jenkins because its based on ubuntu, and running the build slave directly on the same node this makes things easy since I am farmiliar.

choose docker image

Fill out some basic information about the Service, like published ports, volumes, environment variables, deployment strategy etc. When your finished, click “Create and Deploy”

config tutum service

Once this node is deployed, as you made sure you forwarded/published a port, we can see our Jenkins endpoint under “Endpoints

running jenkins tutum

Screen Shot 2015-03-24 at 10.51.47 PM

http://jenkins-bec07d77-1.wallnerryan.cont.tutum.io:49154/  (Feel free to visit the page and look around at the builds)

tutumjenkinsdeploy

In order for our GitHub integration to work we need to install some basic plugins.

install plugins

Our example repository is a simple C source repo that build a programs called primes which can be used to calculate prime numbers.

https://github.com/wallnerryan/primes Screen Shot 2015-03-24 at 10.57.48 PM

To configure this inside of Jenkins, create a new build item and under the SCM portion click Git and add your repository URL as well as your credentials.

add credentials tp primes-build

We also can add a trigger for build to happen on new commits.

build triggers changes to github or periodically

Our build steps are fairly simple for this, just install the dependencies and run configure, make, and make install.

build shell scripts that test build

Now to test our new build out, make a change to a file and push to the master branch.

localpush git

Your should see an active build start, you should see it in your Build History

active build

You can dig on that build # and actually see the commit that it relates to, making it really nice to see which changes broke your build.

build based on push to github

This should let us add the build status to our Github page like the below.

Screen Shot 2015-03-24 at 11.00.03 PM

Jenkins also allows us to view build trends.

tutum build status graph

Conclusion

I wanted to take a bit of time to run through a Continuous Integration example using Jenkins, Tutum, and GitHub to show how you can quickly get up and running with these cloud native platforms and technologies. What I didn’t show it how to also add Docker Engines as Jenkins Slaves for custom environments, if you would like to see that let me know. I might get some time to update this with an example in the future as well.

What is continuous integration?

If your wondering, here is a great article by Martin Fowler that does a really great job explaining what CI is, the benefits of doing so, drivers for CI and how to get there. Continuous Integration

Exploring Powerstrip from ClusterHQ: A Socketplane Adapter for Docker

icon_512x512ClusterHQ_logopowerstrip@2x

sources: http://socketplane.io, https://github.com/ClusterHQ/powerstrip, http://clusterhq.com

Over the past few months one of the areas worth exploring within the container ecosystem is how it works with external services and applications. I currently work in EMC CTO Advanced Development so naturally my interest level is more about data services, but because my background working with SDN controllers and architectures is still one of my highest interests I figured I would get to know what Powerstrip was by working with Socketplane’s Tech Release.

*Disclaimer:

This is not the official integration for powerstrip with sockeplane merged over the last week or so, I was working on this in a rat hole and it works a little differently than the one that Socketplane merged recently.

What is Powerstrip?

Powerstrip is a simple proxy for docker requests and responses to and from the docker client/daemon that allows you to plugin “adapters” that can ingest a docker request, perform an action, modification, service setup etc, and output a response that is then returned to Docker. There is a good explaination on ClusterHQ’s Github page for the project.

Powerstrip is really a prototype tool for Docker Plugins, and a more formal discussion , issues, and hopefully future implementation of Docker Plugins will come out of such efforts and streamline the development of new plugins and services for the container ecosystem.

Using a plugin or adapter architecture, one could imagine plugging storage services, networking services, metadata services, and much more. This is exactly what is happening, Weave, Flocker both had adapters, as well as Socketplane support recently.

Example Implementation in GOlang

I decided to explore using Golang, because at the time I did not see an implementation of the PowerStripProtocol in Go. What is the PowerStripProtocol?

The Powerstrip protocol is a JSON schema that Powerstrip understands so that it can hook in it’s adapters with Docker. There are a few basic objects within the schema that Powerstrip needs to understand and it varies slightly for PreHook and PostHook requests and responses.

Pre-Hook

The below scheme is what PowerStripProtocolVersion: 1 implements, and it needs to have the pre-hook Type as well as a ClientRequest.

{
    PowerstripProtocolVersion: 1,
    Type: "pre-hook",
    ClientRequest: {
        Method: "POST",
        Request: "/v1.16/container/create",
        Body: "{ ... }" or null
    }
}

Below is what your adapter should respond with, a ModifiedClientRequest

{
    PowerstripProtocolVersion: 1,
    ModifiedClientRequest: {
        Method: "POST",
        Request: "/v1.16/container/create",
        Body: "{ ... }" or null
    }
}

Post-Hook

The below scheme is what PowerStripProtocolVersion: 1 implements, and it needs to have the post-hook Type as well as a ClientRequest and a Server Response. We add ServerResponse here because post hooks are already processed by Docker, therefore they already have a response.

{
    PowerstripProtocolVersion: 1,
    Type: "post-hook",
    ClientRequest: {
        Method: "POST",
        Request: "/v1.16/containers/create",
        Body: "{ ... }"
    }
    ServerResponse: {
        ContentType: "text/plain",
        Body: "{ ... }" response string
                        or null (if it was a GET request),
        Code: 404
    }
}

Below is what your adapter should respond with, a ModifiedServerResponse

{
    PowerstripProtocolVersion: 1,
    ModifiedServerResponse: {
        ContentType: "application/json",
        Body: "{ ... }",
        Code: 200
    }
}

Golang Implementation of the PowerStripProtocol

What this looks like in Golang is the below. (I’ll try and have this open-source soon, but it’s pretty basic :] ). Notice we implement the main PowerStripProtocol in a Go struct, but the JSON tag and options likes contain an omitempty for certain fields, particularly the ServerResponse. This is because we always get a ClientRequest in pre or post hooks but now a ServerResponse.

powerstripprotogo

We can implement these Go structs to create Builders, which may be Generic, or serve a certain purpose like catching pre-hook Container/Create Calls from Docker and setting up socketplane networks, this you will see later. Below are generall function heads that return an Marshaled []byte Go Struct to gorest.ResponseBuilder.Write()

buildprehook

builtposthook

Putting it all together

Powerstrip suggests that adapters be created as Docker containers themselves, so the first step was to create a Dockerfile that built an environment that could run the Go adapter.

Dockerfile Snippets

First, we need a Go environment inside the container, this can be set up like the following. We also need a couple of packages so we include the “go get” lines for these.

pwerstripdockerfilego

Next we need to enable our scipt (ADD’ed earlier in the Dockerfile) to be runnable and use it as an ENTRYPOINT. This script takes commands like run, launch, version, etc

runascript

Our Go-based socketplane adapter is laid out like the below. (Mind the certs directory, this was something extra to get it working with a firewall).

codelayout

“powerstrip/” owns the protocol code, actions are Create.go and Start.go (for pre-hook create and post-hook Start, these get the ClientRequests from:

  • POST /*/containers/create

And

  • POST /*/containers/*/start

“adapter/” is the main adapter that processes the top level request and figures out whether it is a prehook or posthook and what URL it matches, it uses a switch function on Type to do this, then sends it on its way to the correct Action within “action/”

“actions” contains the Start and Create actions that process the two pre hook and post hook calls mentioned above. The create hook does most of the work, and I’ll explain a little further down in the post.

actions

Now we can run “docker buid -t powerstrip-socketplane .” in this directory to build the image. Then we use this image to start the adapter like below. Keep in mind the script is actually using the “unattended nopowerstrip” options for socketplane, since were using our own separate one here.

docker run -d --name powerstrip-socketplane \
 --expose 80 \
 --privileged \ 
 --net=host \
 -e BOOTSTRAP=true \
 -v /var/run/:/var/run/ \
 -v /usr/bin/docker:/usr/bin/docker \
 powerstrip-socketplane launch

Once it is up an running, we can use a simple ping REST URL to test if its up: It should respond “pong” if everything is running.

$curl http://localhost/v1/ping
pong

Now we need to create our YAML file for PowerStrip and start our Powerstrip container.

Screen Shot 2015-02-04 at 4.23.59 PM

Screen Shot 2015-02-04 at 4.24.05 PM

If all is well, you should see a few containers running and look somthing like this

dddd151d4076        socketplane/socketplane:latest   "socketplane --iface   About an hour ago   Up About an hour                             romantic_babbage

6b7a63ce419a        clusterhq/powerstrip:v0.0.1      "twistd -noy powerst   About an hour ago   Up About an hour    0.0.0.0:2375->2375/tcp   powerstrip
d698047800b1        powerstrip-socketplane:latest    "/opt/run.sh launch"   2 hours ago         Up About an hour                             powerstrip-socketplane

The adapter will automatically spawn off a socketplane/socketplane:latest container because it installs socketplane brings up the socketplane software.

Once this is up, we need to update our DOCKER_HOST environment variable and then we are ready to go to start issuing commands to docker and our adapter will catch the requests. Few examples below.

export DOCKER_HOST=tcp://127.0.0.1:2375

Next we create some containers with a SOCKETPLANE_CIDR env vairable, the adapter will automatically catch this and process the networking information for you.

docker create --name powerstrip-test1 -e SOCKETPLANE_CIDR="10.0.6.1/24" ubuntu /bin/sh -c "while true; do echo hello world; sleep 1; done"
docker create --name powerstrip-test2 -e SOCKETPLANE_CIDR="10.0.6.1/24" ubuntu /bin/sh -c "while true; do echo hello world; sleep 1; done”

Next, start the containers.

docker start powerstrip-test1

docker start powerstrip-test2

If you issue an ifconfig on either one of these containers, you will see that it owns an ovs<uuid> port that connects it to the virtual network.

sudo docker exec powerstrip-test2 ifconfig
ovs23b79cb Link encap:Ethernet  HWaddr 02:42:0a:00:06:02

          inet addr:10.0.6.2  Bcast:0.0.0.0  Mask:255.255.255.0

          inet6 addr: fe80::a433:95ff:fe8f:c8d6/64 Scope:Link

          UP BROADCAST RUNNING  MTU:1440  Metric:1

          RX packets:12 errors:0 dropped:0 overruns:0 frame:0

          TX packets:9 errors:0 dropped:0 overruns:0 carrier:0

          collisions:0 txqueuelen:0

          RX bytes:956 (956.0 B)  TX bytes:726 (726.0 B)

We can issue a ping to test connectivity over the newly created VXLAN networks. (powerstrip-test1=10.0.6.2, and powerstrip-test2=10.0.6.3)

$sudo docker exec powerstrip-test2 ping 10.0.6.2

PING 10.0.6.2 (10.0.6.2) 56(84) bytes of data.

64 bytes from 10.0.6.2: icmp_seq=1 ttl=64 time=0.566 ms

64 bytes from 10.0.6.2: icmp_seq=2 ttl=64 time=0.058 ms

64 bytes from 10.0.6.2: icmp_seq=3 ttl=64 time=0.054 ms

So what’s really going on under the covers?

In my implementation of the powerstrip adapater, the adapter does the following things

  • Adapter recognizes a Pre-Hook POST /containers/create call and forwards it to PreHookContainersCreate
  • PreHookContainersCreate checks the client request Body foe the ENV variable SOCKETPLANE_CIDR, if it doesn’t have it it returns like a normal docker request. If it does then it will probe socketplane to see if the network exists or not, if it doesn’t it creates it.
  • In either case, there will be a “network-only-container” created connected to the OVS VXLAN L2 domain, it will then modify the response body in the ModifiedClientRequest so that the NetworkMode gets changed to –net:container:<new-network-only-container>.
  • Then upon start the network is up and the container boots likes normal with the correct network namespace connected to the socketplane network.

Here is a brief architecture to how it works.

diag

Thanks for reading, please comment or email me with any questions.

Cheers!