The State of Containers
Why should we care?
Background
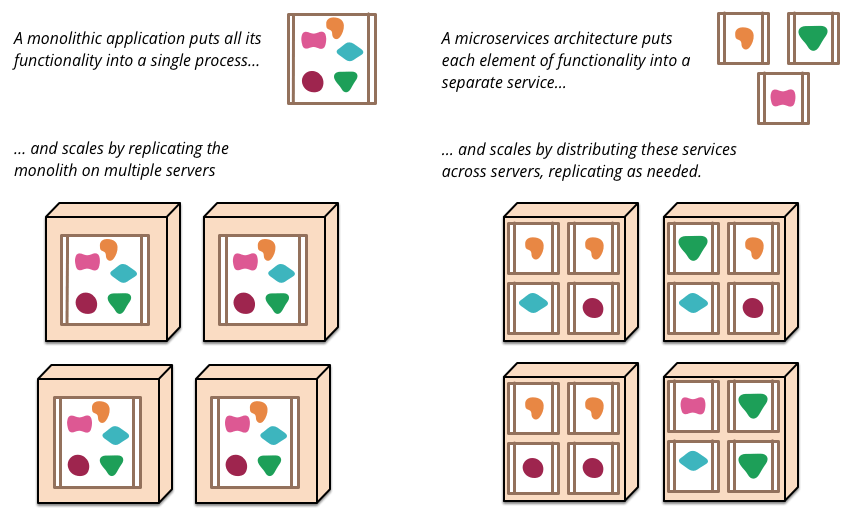
What’s a container?
A container (Linux Container) at its core is an allocation, portioning, and assignment of host (compute) resources such as CPU Shares, Network I/O, Bandwidth, Block I/O, and Memory (RAM) so that kernel level constructs may jail-off, isolate or “contain” these protected resources so that specific running services (processes) and namespaces may solely utilize them without interfering with the rest of the system. These processes could be lightweight Linux hosts based on a Linux image, multiple web severs and applications, a single subsystem like a database backend, to a single process such as ‘echo “Hello”’ with little to no overhead.
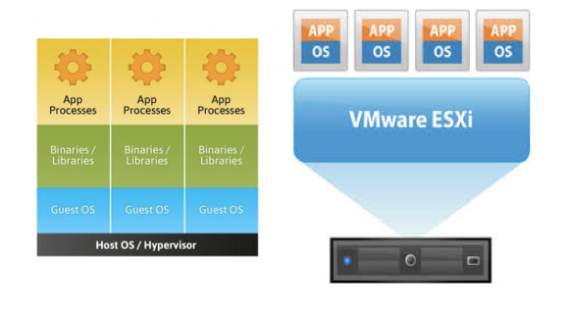
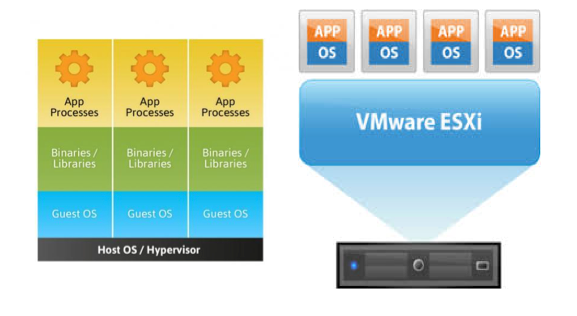
Commonly known as “operating system-level virtualization” or “OS Virtual Environments” containers differ from hypervisor level virtualization. The main difference is that the container model eliminates the hypervisor layer, redundant OS kernels, binaries, and libraries needed to typically run workloads in a VM.
Hypervisor-based
Some of the main business drivers and strategic reasons to use containers are:
- Ability to easily run and accommodate legacy applications
- Performance benefits of running on bare-metal, no overhead of hypervisor
- Higher density and utilization for resources in the datacenter
- Adoption for new technologies is accelerated, put in isolated secure containers
- Reduce “shipping” pains; code is easily streamlined to customers, fast.
Container-based
Containers have been around for over 15 years, so why is there an influx of attention for containers? As compute hardware architectures become more elastic, potent, and dense, it becomes possible to run many applications at scale while lowering TCO, eliminating the redundant Kernel and Guest OS code typically used in a hypervisor-based deployment. This is attractive enough but also has benefits such as eliminating performance penalties, increase visibility and decrease difficulty of debug and management.
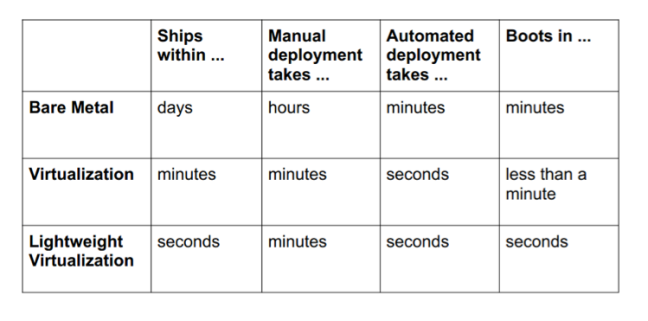
image credit: Jerome Petazzoni from dotCloud)
http://www.socallinuxexpo.org/sites/default/files/presentations/Jerome-Scale11x%20LXC%20Talk.pdf
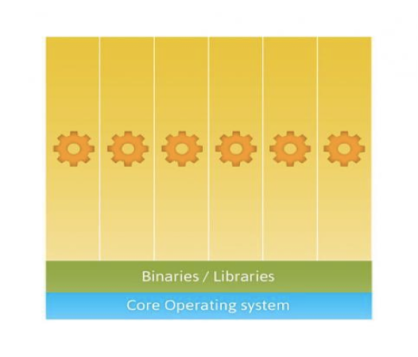
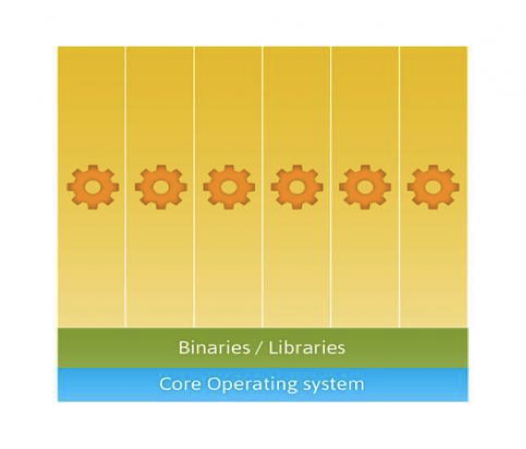
Because containers share the host kernel, binaries and libraries, can be packed even denser than typical hypervisor environments can pack VM’s.
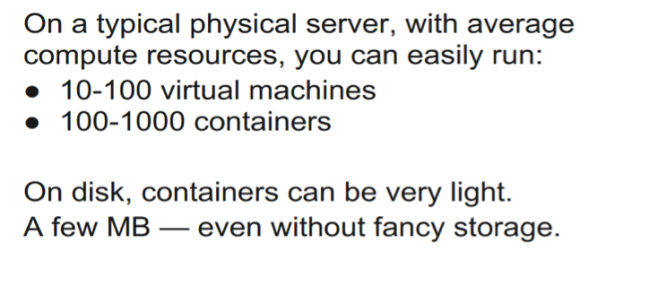
image credit: Jerome Petazzoni from dotCloud)
http://www.socallinuxexpo.org/sites/default/files/presentations/Jerome-Scale11x%20LXC%20Talk.pdf
Solutions and Products
Companies such as RedHat, Sun, Canonical, IBM, HP, Docker and others have adapted or procured slightly different solutions to Linux Containers. Below is a brief overview of the different solutions that deal with containers and or operating system-level virtualization.
Container Solutions
o 0.1.0 releases in 2008
o Works with general vanilla Linux kernels off the shelf.
o GNU GPLv2 License
o Used as a “container engine” in Docker
o Google App Engine utilizes an LXC-like technology
o Parellels Virtouzzo utilizes LXC
o Rackspace Cloud Databases utilize LXC
o Heroku (Application Deployment Platform) utilize LXC
o Developed by (formally dotCloud) Docker Inc.
o Apache 2.0 License
o Docker is really an orchestration solution built on top of the linux kernel, namespaces, cgroups, chroot, and file system constructs. Docker originally chose LXC as the “engine” but recently developed their own solution called “libcontainer”
o Solutions:
- “Decker” – Modified version of the engine works with Cloud Foundry to deploy application workloads
- Openshift
- AWS Elastic Beanstalk Containers
- Openstack Solum
- Openstack Nova
o Supported by Parallels Inc. (back in 1999 as SWsoft became Parallels in 2004)
o Share many of the same developers as LXC, but was developed earlier on, LXC is a derivation of OpenVZ for the mainline kernel.
o GNU GPL v2 License
o Runs on a patched Linux kernel (specific kernel) or 3.x with reduced feature set
o Live Migration Abilities (check pointing) (CRIU “criu.org)
Rackspace Cloud Databases also utilize OpenVZ
o Developed by Cloud Foundry as an orchestration layer to create application containers. Initially said working with LxC was “too troublesome”.
o (Comparison) Warden and Docker both orchestrate containers controlling the subsystems like linux cgroups, namespaces and security.
o A “non-linux” containerization mechanism. Differ from “true” linux systems of the mainline kernel
o Utilizes “Zones” as a construct for partitioning system resources. Zones are an enhanced chroot mechanism that adds additional features like ones included in ZFS that allow snapshotting and cloning.
o Zones are commonly compared to FreeBSD Jails
o Also “non-linux” containerization mechanism. Differ from “true” linux systems of the mainline kernel
o Also an “enhanced chroot”-like mechanism where not only does it use chroot to segregate the file system but it also does the same for users, processes and networks.
o GNU GPL v2
o Patched kernel to enable os-level virtualization
o Partitions of CPU, Memory, Network, Filesystem are called “Security Contexts” which uses a chroot-like mechanism
o Utilizes CoW(Copy on Write) file systems to save storage space.
o AIX Implementation that provides resource isolation like container technologies to in Linux
- Parallels (SWsoft) Virtuozzo Containers
o Originially developed by SWsoft, parallels utilizes linux namespaces and cgroups technologies in the kernel to provide isolation.
o Virtuozzo Containers become OpenVZ, when then became LXC for mainline linux kernel.
o HP’s Unix variant of containers. Like AIX WPARS this is a container technology tailored toward Unix platforms.
o Developed by IBM, this container technology is aimed at the AIX (Unix) based server OS platform.
o Provides os-level environment isolation like other container models do.
o Live application mobility (migration)
o A Free Windows XP container solution. Provides os-level isolated computing environments for XP
o Developed by Invincea for Windows XP
o “Sandboxes”, like a container, are created for isolated environments.
Related tools and mechanisms
o A userspace virtualization tool developed for Open BSD systems. Much like the FreeBSS “jail”
o Kernel level function that allows a program to run in a host system in its own root filesytem.
o Developed in 2006, used initially by Google Search
o Unified in linux kernel by 2013.
o Construct that allows partitioning and isolation of different resources so that they are only available to the processes in the container. Namespaces are Network (NET), UTS(hostname), PROC(process id), MNT (mount), IPC and User (Security Seperation)
o Written in Go programming language and developed by dotCloud/Docker it is a native Go implementation of “lxc-like” control over cgroups and namespaces.
o Container library developed by engineers at Parallels
- LPARs (Logical Partitions)
o (Not linux related, not part of the related container “hype”) but an LPAR is essentially a partitioned set of network, compute, security, storage that can run processes and virtual machine.The difference is LPAR’s need an OS image.
Note: Kernel Namespaces and Cgroups became the defacto standard for creating linux containers and is used by most of the companies who have containerized technology, LXC, Docker, ZeroVM, Parallels, etc. 2013 was the first year that a linux kernel supporting OpenVZ worked with no patches, this was an example of kernel unification and the communities have since seen a boom in container technologies.
Different Containerization Models
The models in which containers and containerization are formed have somewhat of a common denominator. They all need a shared kernel, and in some way have all made adaptations to the linux kernel to provide constructs like “security contexts”, “jails”, “containers”,“sanboxes”, “zones”, “virtual environments” etc. At a low-level the model remains consistent, partitioning host resources into smaller isolated environments, but when we look at how they are delivered, that’s where we see the different usecase models emerge.
Low-level Model
“Jails or Zones” with Patches Linux Kernel
- Proprietary based solutions usually based off a patched linux kernel. OpenVZ, Parallels and Unix bases solutions started this way. Once cgroups and namespace were adopted into the kernel, this became the common way to bring a containerized solution to market.
“Cgroups and Namespaces”
- Defacto standard for create Linux-based Isolated OS-level containers.
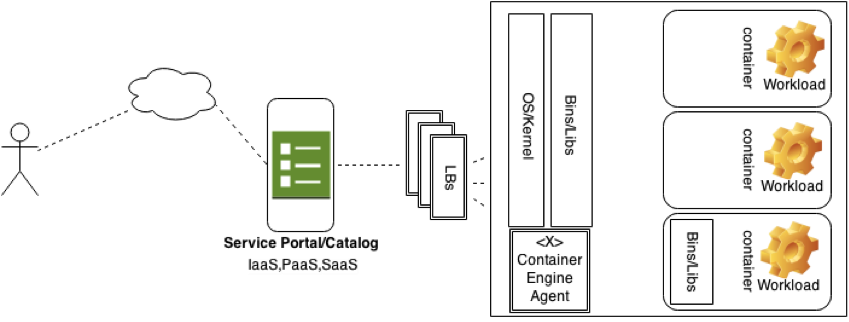
High-level Container Orchestration and Delivery Models
The common ways containers are consumed are through some orchestration mechanism, usually through a portal or tool. This tool then communicates to a service level and requirements (YAML, Package List , or Built Images) get forwarded to a backend container engine. Whether that is LXC, Docker, OpenVZ, or others is up to the provider.
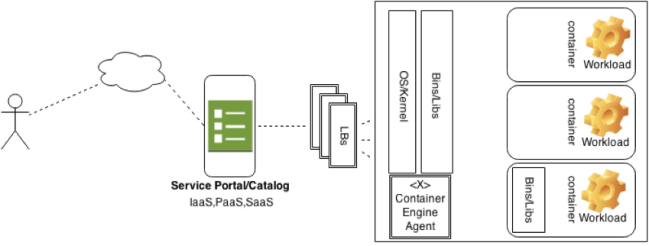
IaaS
In this model containers are consumed as VM’s are, they can be requested with such attributes like CPU, Network, and Storage options. From the consumer’s point of view, it looks exactly like a VM.
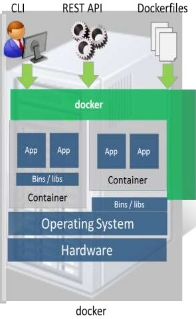
A few examples of this model are Openstack and Docker itself. The “docker-way” uses a userspace daemon that takes CLI or RESTful requests from a client. The daemon, which sits on the compute resources, utilizes a “container engine” like libcontainer or LxC to build the isolated environment based on a certain type of Linux image (from Docker Registry or Glance) provided. A note here that Docker Registry [4] is a platform for uploading and storing pre-built docker-images specific to an application, say a Fedora Image with Apache installed and configured.
Openstack takes advantage of this Docker model and provides ways for Nova to integrate with Docker via a single driver to provide IaaS to consumers. It also integrates with Openstack Heat.
PaaS
This is one of the major “best-fit” usecases for containers. Containers offer the agility, consistency, and efficiency PaaS platforms need, containers can be spun up/down, changed in seconds. This lends itself useful to platforms like OpenShift , Heroku, Cloudfoundry, and Openstack Solum. Applications can be imported and recognized at the same time that containers provide easily customizable computing environments on the fly for different types of workloads. The consumer does not interact with the container in the model, but rather the provider takes advantage of the container technology itself.
SaaS
Containers lend themselves very well to sharing software; containers can easily be used to provide a software service on demand. An example of this case is http://www.memcachedasaservice.com/ [1], which uses containers to provide memcache-based service inside a container to the consumer. The benefit here is that you can provide these services in a largely distributed and scalable while also allowing the provider to densely utilizes its resources.
Pros & Cons of different containerization models
| Model |
Pros |
Cons |
| IaaS |
Fast, Dense, Bare Metal performance. |
Limited Options, No windows VM’s. Lacks some security features compared to VM’s. (This can be argued though) |
| PaaS |
Efficient, Flexible, Dense, Easy to Manage |
Limited to Linux |
| SaaS |
Flexible, Easy to Manage |
Limited to Linux |
Note* Although this says “limited to linux containers” there has been some talk about getting container orchestration solutions to be able to talk commonly between lightweight virtualization solutions so that describing a container could be common and thus this could deploy containers to LNX / Windows solutions. Libct is one effort here to unify container solutions.
Type of apps and workloads, what model works best
(Top use cases for containers, PaaS seems to stick out at best-fit)
HPC Worklods
Containers do not have the overhead of a hypervisor layer and because of this they gain the performance of the host it is running on. Thousands of containers can be spun up in and instant to run distributed operations with power and scale.
Public and Private Clouds
Containers lend themselves well to cloud-based solutions because of the density, flexibility, and speed of containers. Openstack, Google Compute and Tutum are all using containers in this space.
PaaS & Manages Services
Probably one of the best use cases for containers in the market today. Providing PaaS involves a lot of orchestration and flexibility of the underlying service, containers are a clear winner in this space. CloudFoundry, Openshift, AWS Elastic BeanStalk, and Openstack Solum are PaaS solutions based on containers.
SaaS, Application Deployment
A close second to a best-fit model to PaaS, containers also lend themselves well to SaaS architectures as containers can provide isolated, customizable environments for different software services independent of the host it is running on. Memcache as a Service, and Rackspace Cloud Databases are good examples of this.
Development and Test/QA
One of this initial usecases for containers was to allow developers the freedom of running unit tests, trying new code, and running experiments in an isolated manner. Containers today are still widely used for this purpose and some system have there CI system built together with container technology to run isolated test jobs on new code.
An aside on Containers in the real world
Openstack + Containers
Nova
Since the Havana release Openstack Nova has supported (in some way) using docker containers as an alternative or side-by-side to VM’s. Originally the openstack driver delivered was directly to a host, but now in the IceHouse release, Openstack Heat does the driving while the container engine is setup and run inside of a cloud instance. the nova driver is now part of stackforge and will possibly try to rejoin the nova code base in Juno.
http://blog.docker.com/tag/openstack-2/
Solum
Openstack Solum is a PaaS incubation project in openstack that is currently part of stackforge that uses docker in a similar way that OpenShift and CloudFoundry do to orchestrate applications. Containers are used in the background to this project to build specialized workloads for the consumer.
https://wiki.openstack.org/wiki/Solum
Trove
The DBaaS (Database as a Service) Openstack project is also using containers to deliver multi-tenant databases on-demand within the Openstack architecture.
CloudFoundry + Containers
Cloud foundry Platform as a Service utilizes both LXC, and Docker technology under the covers. CloudFoundry had originally chosen LXC and built a tool called “warden” on top of it to manage the containers because they didn’t like using LXC outright. Docker containers also have something called a Dockerfile, which in short is a list of actions to be taken on the containerized environment once it’s built, like package management and installation to the startup and management of services. Much like a DevOps tool, this can be very powerful. This was a driving factor for the adopted version of Docker call “Decker” which implements their Droplet Execution Agent’s API. CF now lets you deploy docker and lxc based containers (droplets) using CF’s tooling.
Openshift+ Containers
Openshift (by Redhat) much like the CloudFoundry Droplet provides something called Gears in its PaaS offering. Gears are native containers built from cgroups and namespaces that run the workloads. Openshift recently [2] adopted the Docker technology to deploy gears. This allowed them to take advantage of Docker inside their Cartridge and Gear system. By using Docker Images with metadata as a Cartidge and using Docker Containers as Gears(containers) based on the Cartridge. Redhat chose the container model because they could “achieve a higher density of applications per host OS and enable those applications to be deployed much more quickly than with a traditional VM-based approach”.
AWS+ Containers
Amazon Elastic Beanstalk allows developers to load their applications into AWS while providing them flexibility and management within the PaaS. Elastic Beanstalk recently [3] adopted Docker so that developers can package or “build” Docker images (templates for the application) and deploy them into AWS with support from Elastic Beanstalk.
Google + Containers
Not (google+) but rather google using linux containers. I dont have much detail on the implementation here, but i’ve heard Google uses linux containers both, originally for Google Search, and now in its cloud compute engine. If anyone has more detail here, please comment 🙂
Legacy Code Support
Containers are also used to run legacy application within the datacenter. Even when hardware refresh occurs, containers can implement older libraries and images to provide legacy applications to run on modern hardware.
New Technology Adoption
Containers also offer a solution to early adoption to software. Containers offer secure isolated environments that let developers run, test, and evaluate new applications and software.
State of Security and Containers
For truly secure container the root user in container can be mapped to “nobody” user/group and when this user gets out of container it doesn’t not affect “root” user on the host because “nobody” have very few privileges. Therefore:
- Root on the container is not Root on the host.
Not all container technologies utilize this security model but do implement SELinux, GRSEC, and AppArmour, which help. Safely running the workloads as non-root users will be the best way to help distort the lines between the security of VM and Containers.
Other attack surfaces for containers can be (in order from less likely to more likely) the linux kernel constructs like cgroups and namespaces themselves, to the client or daemon responsible for responding to requests for host resources, which could be API, Websocket, or Unix Socket. Designed correctly, and used correctly, containers can be a secure solution.
There is a lot more on the security topic, you can start (here) for a good introduction.
Thanks for Reading
Please feel free to correct the history or any fact that I may have looked over too quick or didnt get right, I’d be happy to change it and get it correct. Containers are gaining ground in todays cloud infrastructures and there is a lot of interesting things going on, so keep your eyes and ears open because I’m sure you will hear more about them in the coming years.
Something I didnt touch on in the post was how storage works with containers. There are many different options that have pros and cons, Whether container solutions are using aufs, btrfs, xfs, device mapper, copy on write mechanisms, etc the main point is that they work at the file layer, not the block layer. While you could export iscsi/FC volumes to the hosts and use something lik e –volumes-from in Docker for persistency this is outside the direct scope of how containers maintain a low profile on the host. If you want more info or another post on this I can certainly do so.
Also, In coming posts, I think I will try and get some technical tutorials and demos around the container subject, keep posted, I will most likely be using Docker or LxC directly to do the demos!
Resources

References
[1] http://www.memcachedasaservice.com/,
http://www.slideshare.net/julienbarbier42/building-a-saas-using-docker
[2] https://www.openshift.com/blogs/the-future-of-openshift-and-docker-containers
[3] http://aws.amazon.com/about-aws/whats-new/2014/04/23/aws-elastic-beanstalk-adds-docker-support/
[4] https://registry.hub.docker.com/


