Tag Archives: cloud

Microservices: An architecture from scratch using Docker, Swarm, Compose, Consul, Facter and Flocker

compose consul docker flocker puppet swarm

You might be asking yourself about the information going around about microservices, containers, and the many different tools around building a flexible architecture or “made-of-many-parts” architecture. Well you’re not alone, and there are many tools out there helping (or confusing) you to do so. In this post I’ll talk about some of the different options available like Mesos, Docker Engine, Docker Swarm, Consul, Plugins and more out there. The various different layers involved in a modern microservices architecture have various responsibilities and deciding how you can go about choosing the right pieces to build out those layers can be tough. This post is by far not the only way you can put the layers together and in fact this is MY opinion on the subject given the experience I have had in the ecosystem, it also does not reflect ideas of my employer.

Typically I define modern microservices architecture as having the following layers and responsibilities:

  • Applications / Frameworks / App Manifests
  • Scheduling
  • Orchestration
  • Monitoring / Logging / Auditing
  • Service Discovery
  • Cluster Management / Distributed Systems State
  • Data Services and Intelligence

To give you an idea of the tools available and technologies that fall into these categories, here is the list again, but with some of the projects, products and technologies in the ecosystem added. keep in mind this is not an exhaustive list.

*UPDATE: here is separate post aimed at making this a more exhaustive list

So lets choose a few components, we choose components apart from networking which we leave out here and just use host-only networking with vagrant, but we could add in libnetwork support in Docker directly. For logging and monitoring, we also just spin up DockerUI for this but could also add in loggly, fluentd, sysdig and others.

  • Consul – Service Discovery, DNS, K/V Storage
  • Docker Engine (Runtime)
  • Docker Swarm (Scheduler / Cluster / Distributed State )
  • Docker Compose (Orchestration)
  • Docker Plugins (Volume integration)
  • Flocker (Data Services / Orchestration)

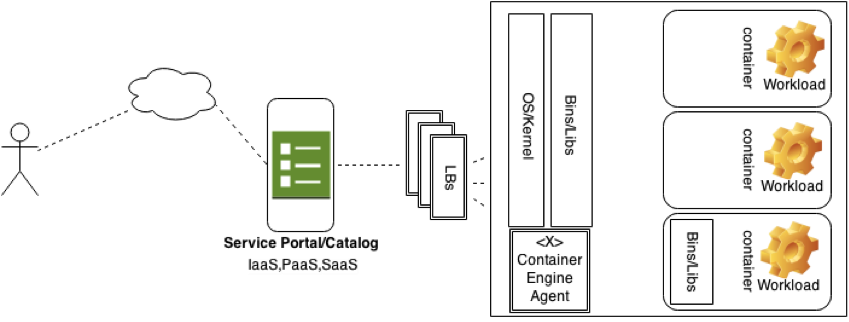
So what do these layers look like all together? We can represent the layers I mentioned above the the following way, including the applications as a logical mapping to the containers running programs and processes above.

microservicesblock

Above, we can put together a microservices architecture with the tools defined above, atop of this we can create applications from manifests and schedule containers onto the architecture once this is all running. I want to pinpoint a few specific areas in this architecture because we can add some extra logic to this to make things a little more interesting.

Service Discovery and Registration:

The registration layer can serve many purposes, it is mostly used to register and allow discovery of services (microservices/containers) that are running on a system/cluster. We can use consul to do this type of registration within its key / value mechanisms. You can use Consul’s built-in service mechanism or there are other ways to talk to consul key/value like registrator. In our example we can use the registry layer for something a little more interesting, in this case we can use consul’s locking mechanisms to lock resources we put in them, allowing schedulers to tap into the registry layer instead of talking to every node in the cluster for updates on CPU, Memory etc.

We can add resource updating scripts to our consul services by adding a service to consul’s service mechanism, these services will import keys and values from Facter and other resources then upload them to the K/V store, consul will also health check these services for us as a added benefit.

Below we can see how Consul registers services, in this case we register an “update service” which updates system resources into the registry layer.

consul-service

We now have the ability to add many system resources, but we also have the flexibility to upload custom resources (facts) like system overload and memory swap free, the below “fact” is a sample of how we can do so giving us a system overload.

custom_fact

Doing so, we can enable the swarm scheduler to use them for scheduling containers. Swarm does not do this today, instead it has only static labels added when the docker engine is started, in this example our swarm scheduler utilizes dynamic labels by getting up-to-date realtime labels that mean something to the system which allows us to schedule containers a little better. What this looks like in swarm is below. See “how to use” section below for how this actually gets used.

swarm info

Data Services Layer:

Docker also allows us to plug into its ecosystem for volumes with volume plugins which enable containers to add data services like RexRay and Flocker. This part of the ecosystem is rapidly expanding and today we can provision fairly basic volumes with a size, and basic attributes. Docker 1.9 has a volume API which introduces options (opts) for more advanced features and metadata passed to data systems. As you will see in the usage examples below, this helps with more interesting workflows for the developer, tester, etc. As a note, the ecosystem around containers will continue to grow fast, use cases around different types of applications with more data needs will help drive this part of ecosystem.

If your wondering what the block diagram may actually looks like on a per node (server/vm) basis, with what services installed where etc, look no more, see below.

ms1

From the above picture, you should get a good idea of what tools sit where, and where they need to be installed. First, every server participating in the cluster needs a Swarm Agent, Flocker-Dataset-Agent, Docker Plugin for Docker, A Consul server (or agent depending how big the cluster, at least 3 servers), and a Docker Engine. The components we talked about above like the custom resource registration has custom facter facts on each node as well so consul and facter can import them appropriately. Now, setting this up by hand is sure to be a pain in the a** if your cluster is large, so in reality we should think about the DevOps pipeline and the roll of puppet, or chef to automate the deployment of a lot of this. For my example I packed everything into a Vagrantfile and vagrant shell scripts to do the install and configuration, so a simple “vagrant up” would do, given I have about 20-30 minutes to watch the cluster come up 🙂

How do I use it!!?

Okay, lets get to actually using this microservices cluster now that we have it all set. This section of the blog post should give you an idea of the use cases and types of applications you can deploy to your microservices architecture and what tooling to use given then above examples and layers we introduced.

Using the Docker CLI with Swarm to schedule new resources via constraints and volume profiles.

This will look for specific load between 0-25% because we have a custom registration layer. *(note, some of the profiles work was in collaboration Mahuri from CHQ and Sean Dell for the Docker Global Hackday #3)

docker run -d -e constraint:system_overload_10min==/[0-2][0-5]/ -e constraint:architecture==x86_64 -e constraint:virtual=virtualbox -e constraint:selinux_enforced=false -v myVol@gold:/data/ redis

Using Docker Compose with Flocker volume driver that supports storage profiles:

This will schedule a redis database container using the flocker volume driver with a “gold” volume, meaning we will get a better IOPS, Bandwidth and other “features” that are considered of more performance and value.

Screen Shot 2015-10-01 at 2.24.40 PM

Using Docker compose with swarm to guarantee a server has a specific volume driver and to schedule a container to a server with a specific CPU Overload:

In this example we also use the overload percentage resource in the scheduler but we also take advantage of the registry layer knowing which nodes are running certain volume plugins and we can schedule to Swarm knowing we will get nodes with a specific driver and hypervisor making sure that it will support the profile we want.

Screen Shot 2015-10-01 at 2.25.34 PM

A use case where a developer wants to schedule to specific resources, start a web service, snapshot an entire database container and its data and view that data all using the Docker CLI.

This example shows how providing the right infrastructure tooling to the Docker CLI and tools allows for a more seamless developer / test workflow. This example allows us to get everything we need via the docker CLI while never leaving our one terminal to run commands on a storage system or separate node.

Start MySQL Container with constraints:

docker run -ti -e constraint:is_virtual==True -e constraint:system_overload_10min==/[0-2][0-5]/ -v demoVol@gold:/var/lib/mysql --volume-driver=flocker -p 3306:3306 --name MySQL wallnerryan/mysql
Start a simple TODO List application:

docker run -it -e constraint:is_virtual==True --rm -e DATABASE_IP=192.168.50.13 -e DATABASE=mysql -p 8005:8080 wallnerryan/todolist
We want to snapshot our original MySQL database, so lets pull the dataset-ID from its mount point and input that into the snapshot profile.

docker inspect --format='{{.Mounts}}' MySQL
[{demoVol@gold /flocker/f23ca986-cb43-43c1-865c-b57b1023ab7e /var/lib/mysql flocker z true}]
Here we place a substring of the the Dataset ID into the snapshot profile in our MySQL-snap container creation, this will create a second MySQL container with a snapshot of production data.

docker run -ti -e affinity:container==MySQL -v demoVol-snap@snapshot-f23ca986:/var/lib/mysql --volume-driver=flocker -p 3307:3306 --name MySQL-snap wallnerryan/mysql

At this point we have pretty much been able to snapshot the entire MySQL application (container and data) and all of its data at a point in time while scheduling the point in time data and container to a specific node in one terminal and few CLI commands where our other MySQL database was running. In the future we could see the option to have dev/test clusters and have the ability to schedule different operations and workflows across shared production data in a microservices architecture that would help streamline teams in an organization.

Cheers, Thanks for reading!

Continuous Delivery Workflow with Tutum, Docker, Jenkins, and Github

https://wiki.jenkins-ci.org/download/attachments/65671116/jenkins-stickers.png?version=1&modificationDate=1360595834000http://www.molecularecologist.com/wp-content/uploads/2013/11/github-logo.jpghttps://i.vimeocdn.com/video/472622365_640.jpg

Continuos Integration

Recently I have been playing with a way to easily setup build automation for many small projects Continuos Delivery workflows are perfect for the smaller projects I have so settings up test / build automation is super useful and is even better when it can be spun up for a new project in a matter of minutes so I decides to work with Tutum to run docker-based Jenkins that connects into Github repositories.

In this post I explore setting up continuous integration using the Tutum.co platform using amazon AWS, a Jenkins Docker image, and a simple repository that have a C program that calculates primes numbers as an example of automating the build process when a new push happens to Github.

What I haven’t done for the post is explore using a jenkins slave as a docker engine, but hopefully in the future I can update some experiences I have had doing so which basically allows me to have custom build environments by publishing specialized docker images as what Jenkins creates and builds within. This can be helpful if you have many different projects and need specialized build environments for continuos integration.

Tutum, Docker and Jenkins

What I did first was setup a Tutum account, which was really simple. Just go to https://dashboard.tutum.co/accounts/login and sign in or create an account, I just used my github account and it got me going really quickly. Tutum has a notion of Stacks, Services and Nodes.

Node

A node is an agent for your service to run on. This can be a VM from Amazon, Digital Ocean, Microsoft Azure, or IBM Softlayer. You can also “bring your own” node by making a host publicly reachable and running the Tutum Agent on it.

Service

A service is a container, running some process(s)

Stack

A stack is a collection of Services that can be deployed together. You can use a tutum.yml file which looks and feels just like a Docker Compose yml file to deploy multiple services.

Deploy Jenkins

To deploy Jenkins you must first create a Node, then head to Services and click “create service” Jenkins will be our service.

Screen Shot 2015-03-24 at 10.08.23 PM

We can search the Docker Hub for Jenkins images, I’ll choose aespinosa/jenkins because its based on ubuntu, and running the build slave directly on the same node this makes things easy since I am farmiliar.

choose docker image

Fill out some basic information about the Service, like published ports, volumes, environment variables, deployment strategy etc. When your finished, click “Create and Deploy”

config tutum service

Once this node is deployed, as you made sure you forwarded/published a port, we can see our Jenkins endpoint under “Endpoints

running jenkins tutum

Screen Shot 2015-03-24 at 10.51.47 PM

http://jenkins-bec07d77-1.wallnerryan.cont.tutum.io:49154/  (Feel free to visit the page and look around at the builds)

tutumjenkinsdeploy

In order for our GitHub integration to work we need to install some basic plugins.

install plugins

Our example repository is a simple C source repo that build a programs called primes which can be used to calculate prime numbers.

https://github.com/wallnerryan/primes Screen Shot 2015-03-24 at 10.57.48 PM

To configure this inside of Jenkins, create a new build item and under the SCM portion click Git and add your repository URL as well as your credentials.

add credentials tp primes-build

We also can add a trigger for build to happen on new commits.

build triggers changes to github or periodically

Our build steps are fairly simple for this, just install the dependencies and run configure, make, and make install.

build shell scripts that test build

Now to test our new build out, make a change to a file and push to the master branch.

localpush git

Your should see an active build start, you should see it in your Build History

active build

You can dig on that build # and actually see the commit that it relates to, making it really nice to see which changes broke your build.

build based on push to github

This should let us add the build status to our Github page like the below.

Screen Shot 2015-03-24 at 11.00.03 PM

Jenkins also allows us to view build trends.

tutum build status graph

Conclusion

I wanted to take a bit of time to run through a Continuous Integration example using Jenkins, Tutum, and GitHub to show how you can quickly get up and running with these cloud native platforms and technologies. What I didn’t show it how to also add Docker Engines as Jenkins Slaves for custom environments, if you would like to see that let me know. I might get some time to update this with an example in the future as well.

What is continuous integration?

If your wondering, here is a great article by Martin Fowler that does a really great job explaining what CI is, the benefits of doing so, drivers for CI and how to get there. Continuous Integration

Exploring Powerstrip from ClusterHQ: A Socketplane Adapter for Docker

icon_512x512ClusterHQ_logopowerstrip@2x

sources: http://socketplane.io, https://github.com/ClusterHQ/powerstrip, http://clusterhq.com

Over the past few months one of the areas worth exploring within the container ecosystem is how it works with external services and applications. I currently work in EMC CTO Advanced Development so naturally my interest level is more about data services, but because my background working with SDN controllers and architectures is still one of my highest interests I figured I would get to know what Powerstrip was by working with Socketplane’s Tech Release.

*Disclaimer:

This is not the official integration for powerstrip with sockeplane merged over the last week or so, I was working on this in a rat hole and it works a little differently than the one that Socketplane merged recently.

What is Powerstrip?

Powerstrip is a simple proxy for docker requests and responses to and from the docker client/daemon that allows you to plugin “adapters” that can ingest a docker request, perform an action, modification, service setup etc, and output a response that is then returned to Docker. There is a good explaination on ClusterHQ’s Github page for the project.

Powerstrip is really a prototype tool for Docker Plugins, and a more formal discussion , issues, and hopefully future implementation of Docker Plugins will come out of such efforts and streamline the development of new plugins and services for the container ecosystem.

Using a plugin or adapter architecture, one could imagine plugging storage services, networking services, metadata services, and much more. This is exactly what is happening, Weave, Flocker both had adapters, as well as Socketplane support recently.

Example Implementation in GOlang

I decided to explore using Golang, because at the time I did not see an implementation of the PowerStripProtocol in Go. What is the PowerStripProtocol?

The Powerstrip protocol is a JSON schema that Powerstrip understands so that it can hook in it’s adapters with Docker. There are a few basic objects within the schema that Powerstrip needs to understand and it varies slightly for PreHook and PostHook requests and responses.

Pre-Hook

The below scheme is what PowerStripProtocolVersion: 1 implements, and it needs to have the pre-hook Type as well as a ClientRequest.

{
    PowerstripProtocolVersion: 1,
    Type: "pre-hook",
    ClientRequest: {
        Method: "POST",
        Request: "/v1.16/container/create",
        Body: "{ ... }" or null
    }
}

Below is what your adapter should respond with, a ModifiedClientRequest

{
    PowerstripProtocolVersion: 1,
    ModifiedClientRequest: {
        Method: "POST",
        Request: "/v1.16/container/create",
        Body: "{ ... }" or null
    }
}

Post-Hook

The below scheme is what PowerStripProtocolVersion: 1 implements, and it needs to have the post-hook Type as well as a ClientRequest and a Server Response. We add ServerResponse here because post hooks are already processed by Docker, therefore they already have a response.

{
    PowerstripProtocolVersion: 1,
    Type: "post-hook",
    ClientRequest: {
        Method: "POST",
        Request: "/v1.16/containers/create",
        Body: "{ ... }"
    }
    ServerResponse: {
        ContentType: "text/plain",
        Body: "{ ... }" response string
                        or null (if it was a GET request),
        Code: 404
    }
}

Below is what your adapter should respond with, a ModifiedServerResponse

{
    PowerstripProtocolVersion: 1,
    ModifiedServerResponse: {
        ContentType: "application/json",
        Body: "{ ... }",
        Code: 200
    }
}

Golang Implementation of the PowerStripProtocol

What this looks like in Golang is the below. (I’ll try and have this open-source soon, but it’s pretty basic :] ). Notice we implement the main PowerStripProtocol in a Go struct, but the JSON tag and options likes contain an omitempty for certain fields, particularly the ServerResponse. This is because we always get a ClientRequest in pre or post hooks but now a ServerResponse.

powerstripprotogo

We can implement these Go structs to create Builders, which may be Generic, or serve a certain purpose like catching pre-hook Container/Create Calls from Docker and setting up socketplane networks, this you will see later. Below are generall function heads that return an Marshaled []byte Go Struct to gorest.ResponseBuilder.Write()

buildprehook

builtposthook

Putting it all together

Powerstrip suggests that adapters be created as Docker containers themselves, so the first step was to create a Dockerfile that built an environment that could run the Go adapter.

Dockerfile Snippets

First, we need a Go environment inside the container, this can be set up like the following. We also need a couple of packages so we include the “go get” lines for these.

pwerstripdockerfilego

Next we need to enable our scipt (ADD’ed earlier in the Dockerfile) to be runnable and use it as an ENTRYPOINT. This script takes commands like run, launch, version, etc

runascript

Our Go-based socketplane adapter is laid out like the below. (Mind the certs directory, this was something extra to get it working with a firewall).

codelayout

“powerstrip/” owns the protocol code, actions are Create.go and Start.go (for pre-hook create and post-hook Start, these get the ClientRequests from:

  • POST /*/containers/create

And

  • POST /*/containers/*/start

“adapter/” is the main adapter that processes the top level request and figures out whether it is a prehook or posthook and what URL it matches, it uses a switch function on Type to do this, then sends it on its way to the correct Action within “action/”

“actions” contains the Start and Create actions that process the two pre hook and post hook calls mentioned above. The create hook does most of the work, and I’ll explain a little further down in the post.

actions

Now we can run “docker buid -t powerstrip-socketplane .” in this directory to build the image. Then we use this image to start the adapter like below. Keep in mind the script is actually using the “unattended nopowerstrip” options for socketplane, since were using our own separate one here.

docker run -d --name powerstrip-socketplane \
 --expose 80 \
 --privileged \ 
 --net=host \
 -e BOOTSTRAP=true \
 -v /var/run/:/var/run/ \
 -v /usr/bin/docker:/usr/bin/docker \
 powerstrip-socketplane launch

Once it is up an running, we can use a simple ping REST URL to test if its up: It should respond “pong” if everything is running.

$curl http://localhost/v1/ping
pong

Now we need to create our YAML file for PowerStrip and start our Powerstrip container.

Screen Shot 2015-02-04 at 4.23.59 PM

Screen Shot 2015-02-04 at 4.24.05 PM

If all is well, you should see a few containers running and look somthing like this

dddd151d4076        socketplane/socketplane:latest   "socketplane --iface   About an hour ago   Up About an hour                             romantic_babbage

6b7a63ce419a        clusterhq/powerstrip:v0.0.1      "twistd -noy powerst   About an hour ago   Up About an hour    0.0.0.0:2375->2375/tcp   powerstrip
d698047800b1        powerstrip-socketplane:latest    "/opt/run.sh launch"   2 hours ago         Up About an hour                             powerstrip-socketplane

The adapter will automatically spawn off a socketplane/socketplane:latest container because it installs socketplane brings up the socketplane software.

Once this is up, we need to update our DOCKER_HOST environment variable and then we are ready to go to start issuing commands to docker and our adapter will catch the requests. Few examples below.

export DOCKER_HOST=tcp://127.0.0.1:2375

Next we create some containers with a SOCKETPLANE_CIDR env vairable, the adapter will automatically catch this and process the networking information for you.

docker create --name powerstrip-test1 -e SOCKETPLANE_CIDR="10.0.6.1/24" ubuntu /bin/sh -c "while true; do echo hello world; sleep 1; done"
docker create --name powerstrip-test2 -e SOCKETPLANE_CIDR="10.0.6.1/24" ubuntu /bin/sh -c "while true; do echo hello world; sleep 1; done”

Next, start the containers.

docker start powerstrip-test1

docker start powerstrip-test2

If you issue an ifconfig on either one of these containers, you will see that it owns an ovs<uuid> port that connects it to the virtual network.

sudo docker exec powerstrip-test2 ifconfig
ovs23b79cb Link encap:Ethernet  HWaddr 02:42:0a:00:06:02

          inet addr:10.0.6.2  Bcast:0.0.0.0  Mask:255.255.255.0

          inet6 addr: fe80::a433:95ff:fe8f:c8d6/64 Scope:Link

          UP BROADCAST RUNNING  MTU:1440  Metric:1

          RX packets:12 errors:0 dropped:0 overruns:0 frame:0

          TX packets:9 errors:0 dropped:0 overruns:0 carrier:0

          collisions:0 txqueuelen:0

          RX bytes:956 (956.0 B)  TX bytes:726 (726.0 B)

We can issue a ping to test connectivity over the newly created VXLAN networks. (powerstrip-test1=10.0.6.2, and powerstrip-test2=10.0.6.3)

$sudo docker exec powerstrip-test2 ping 10.0.6.2

PING 10.0.6.2 (10.0.6.2) 56(84) bytes of data.

64 bytes from 10.0.6.2: icmp_seq=1 ttl=64 time=0.566 ms

64 bytes from 10.0.6.2: icmp_seq=2 ttl=64 time=0.058 ms

64 bytes from 10.0.6.2: icmp_seq=3 ttl=64 time=0.054 ms

So what’s really going on under the covers?

In my implementation of the powerstrip adapater, the adapter does the following things

  • Adapter recognizes a Pre-Hook POST /containers/create call and forwards it to PreHookContainersCreate
  • PreHookContainersCreate checks the client request Body foe the ENV variable SOCKETPLANE_CIDR, if it doesn’t have it it returns like a normal docker request. If it does then it will probe socketplane to see if the network exists or not, if it doesn’t it creates it.
  • In either case, there will be a “network-only-container” created connected to the OVS VXLAN L2 domain, it will then modify the response body in the ModifiedClientRequest so that the NetworkMode gets changed to –net:container:<new-network-only-container>.
  • Then upon start the network is up and the container boots likes normal with the correct network namespace connected to the socketplane network.

Here is a brief architecture to how it works.

diag

Thanks for reading, please comment or email me with any questions.

Cheers!

COSBench, Intel’s Cloud Object Storage Bench-marking tool and how to visual it’s data with matplotlib


I am probably missing a few images here, but you get the point, Object Storage is here to stay. It’s becoming more popular as workloads move to cloud based application architecture where HTTP dominates at scale more than ever. So comes the need to be able to run performance tests on our (pick your favorite) open-source object-storage implementation… or not, if your not into it.

The tool I want to talk about it Intel’s COSBench, or “Cloud Object Storage Bench” if you will, a Java based performance benchmarking tool for Object Storage Systems. I’ll also touch on a neat way to visualize the data output by COSBench itself. COSBench defines itself in part:

COSBench is a benchmarking tool to measure the performance of Cloud Object Storage services. Object storage is an emerging technology that is different from traditional file systems (e.g., NFS) or block device systems (e.g., iSCSI). Amazon S3 and Openstack* swift are well-known object storage solutions. (https://github.com/intel-cloud/cosbench)

It allows you to run tests at scale using “Driver Nodes” and “Controller Nodes”. A Driver Node is the node that does the heavy lifting and generates the load that the test will be producing. A Controller Node collects metrics, orchestrates the jobs and keep track of which tests are running on which Drivers etc. Essentially the M&O/Dashboard. Read more about the specifics in the User Guide on Github (UserGuide). I wont go into detail about how to install in the post, I will just say the guide is pretty straight forward, I ran a multi-driver installation on top of OpenStack IceHouse to test Ceph (S3 and Swift Interfaces on the Rados Gateway) and Amazon S3 Directly.

What I will go into a bit is how to define a job, below is an example of how to setup a test for a Rados Gateway Swift endpoint using Ceph. As you can see below, I used a token from OpenStack using the keystoneclient, and an endpoint ending  in /swift/v1 in the “Storage” directive of the COSBench XML file. This small test will run a 100% READ test on 240 Objects in 12 different swift containers. This is what the “container=(#,#) and Objects=(#,#) denote. These objects will be in size Ranges of 25MB, meaning 25MB, 75MB, 175MB…etc.

screenshot1

After submitting the test you will see output in the Controller dashboard that looks like the below image. To get to this data yourself, click on the the “view details” next to the finished job, then click on “view details” next to the Stage ID of w<#>-s<#>-main with the name “main“. You can then click on the “view timeline status” underneath the General Report to get the below timeline data.

Screen Shot

This will give you a breakdown (I believe of every 5 seconds) of the performance metrics collected. The way the metrics are collected and how they are computed is explained in the User Guide (referenced above). If you click the “export CSV file” you can download the CSV version of the output for analysis. Which should look like the below excel sheet:

Screen Shot

Now to the fun part, with this data we can do some fun and interesting things with a python graphing library called matplotlib. Using this we can extract the data we want, like bandwidth, latency or throughput and draw graphs to better visualize our data. I have a few scripts that can be used to do this, made specifically to take input from a COSBench CSV file. Just start the script and pass it the CSV file. (more info on the Github page) https://github.com/wallnerryan/matplotlib-utils-cosbench

Run something like:

#cd matplotlib-utils-cosbench/
#python graph_data_bandwidth_bf.py <csv.file>

The output from the script will be a PNG graph image, the above command gives a graph of Bandwidth over Time in MB/s with a best fit line drawn through the graph. Go ahead, try it if you would like. The output will look something like the below image:

*(depending on your performance numbers, and relative hardware and environment, the graph may look very different)

constant-after-demo.

As a tip, in this case, my Y-Axis is capped at 250, because I know my data points did not go above 250MB/s, if they do, look at the lines around 68 in the source code, there is a message about how to change this. In this example it will look like the below image. (I had changed this one to be 250 based on the below code snippet)

Screen Shot

A note on the script, if you have a lot of data points the graphs can get junked up with data points being too close, there is a option to specify that you would only like the data points every X number of data points. (e.g it will read every 5th data point) Just pass in a separate argument in the form on an integer to the script at the end.

#python graph_data_bandwidth_bf.py <csv.file> <number>

Well, I hope this was interesting for some, and if you have any questions of comments please feel free to comment here or on my github or send me and email. Until next time, cheers.

Linux Containers: Parallels, LXC, OpenVZ, Docker and More

The State of Containers

Why should we care?

Image

Background

What’s a container?

            A container (Linux Container) at its core is an allocation, portioning, and assignment of host (compute) resources such as CPU Shares, Network I/O, Bandwidth, Block I/O, and Memory (RAM) so that kernel level constructs may jail-off, isolate or “contain” these protected resources so that specific running services (processes) and namespaces may solely utilize them without interfering with the rest of the system. These processes could be lightweight Linux hosts based on a Linux image, multiple web severs and applications, a single subsystem like a database backend, to a single process such as ‘echo “Hello”’ with little to no overhead.

            Commonly known as “operating system-level virtualization” or “OS Virtual Environments” containers differ from hypervisor level virtualization. The main difference is that the container model eliminates the hypervisor layer, redundant OS kernels, binaries, and libraries needed to typically run workloads in a VM.

Hypervisor-based

Image

Some of the main business drivers and strategic reasons to use containers are:

  • Ability to easily run and accommodate legacy applications
  • Performance benefits of running on bare-metal, no overhead of hypervisor
  • Higher density and utilization for resources in the datacenter
  • Adoption for new technologies is accelerated, put in isolated secure containers
  • Reduce “shipping” pains; code is easily streamlined to customers, fast. 

Container-based

Image

            Containers have been around for over 15 years, so why is there an influx of attention for containers? As compute hardware architectures become more elastic, potent, and dense, it becomes possible to run many applications at scale while lowering TCO, eliminating the redundant Kernel and Guest OS code typically used in a hypervisor-based deployment. This is attractive enough but also has benefits such as eliminating performance penalties, increase visibility and decrease difficulty of debug and management.

 Image

image credit: Jerome Petazzoni from dotCloud)

http://www.socallinuxexpo.org/sites/default/files/presentations/Jerome-Scale11x%20LXC%20Talk.pdf

            Because containers share the host kernel, binaries and libraries, can be packed even denser than typical hypervisor environments can pack VM’s.

 Image

image credit: Jerome Petazzoni from dotCloud)

http://www.socallinuxexpo.org/sites/default/files/presentations/Jerome-Scale11x%20LXC%20Talk.pdf

Solutions and Products

            Companies such as RedHat, Sun, Canonical, IBM, HP, Docker and others have adapted or procured slightly different solutions to Linux Containers. Below is a brief overview of the different solutions that deal with containers and or operating system-level virtualization.

Container Solutions

  • LxC ( Linux Containers )

o   0.1.0 releases in 2008

o   Works with general vanilla Linux kernels off the shelf.

o   GNU GPLv2 License

o   Used as a “container engine” in Docker

o   Google App Engine utilizes an LXC-like technology

o   Parellels Virtouzzo utilizes LXC

o   Rackspace Cloud Databases utilize LXC

o   Heroku (Application Deployment Platform) utilize LXC

  • Docker

o   Developed by (formally dotCloud) Docker Inc.

o   Apache 2.0 License

o   Docker is really an orchestration solution built on top of the linux kernel, namespaces, cgroups, chroot, and file system constructs. Docker originally chose LXC as the “engine” but recently developed their own solution called “libcontainer

o   Solutions:

  • “Decker” – Modified version of the engine works with Cloud Foundry to deploy application workloads
  • Openshift
  • AWS Elastic Beanstalk Containers
  • Openstack Solum
  • Openstack Nova
  • OpenVZ

o   Supported by Parallels Inc. (back in 1999 as SWsoft became Parallels in 2004)

o   Share many of the same developers as LXC, but was developed earlier on, LXC is a derivation of OpenVZ for the mainline kernel.

o   GNU GPL v2 License

o   Runs on a patched Linux kernel (specific kernel) or 3.x with reduced feature set

o   Live Migration Abilities (check pointing) (CRIU “criu.org)

Rackspace Cloud Databases also utilize OpenVZ

  • Warden

o   Developed by Cloud Foundry as an orchestration layer to create application containers. Initially said working with LxC was “too troublesome”.

o   (Comparison) Warden and Docker both orchestrate containers controlling the subsystems like linux cgroups, namespaces and security.

  • Solaris Containers

o   A “non-linux” containerization mechanism. Differ from “true” linux systems of the mainline kernel

o   Utilizes “Zones” as a construct for partitioning system resources. Zones are an enhanced chroot mechanism that adds additional features like ones included in ZFS that allow snapshotting and cloning.

o   Zones are commonly compared to FreeBSD Jails

  • (Free) BSD Jails

o   Also “non-linux” containerization mechanism. Differ from “true” linux systems of the mainline kernel

o   Also an “enhanced chroot”-like mechanism where not only does it use chroot to segregate the file system but it also does the same for users, processes and networks.

  • Linux V-Server

o   GNU GPL v2

o   Patched kernel to enable os-level virtualization

o   Partitions of CPU, Memory, Network, Filesystem are called “Security Contexts” which uses a chroot-like mechanism

o   Utilizes CoW(Copy on Write) file systems to save storage space.

  • Workload Partitions

o   AIX Implementation that provides resource isolation like container technologies to in Linux

  • Parallels (SWsoft) Virtuozzo Containers

o   Originially developed by SWsoft, parallels utilizes linux namespaces and cgroups technologies in the kernel to provide isolation.

o   Virtuozzo Containers become OpenVZ, when then became LXC for mainline linux kernel.

  • HP-UX Containers

o   HP’s Unix variant of containers. Like AIX WPARS this is a container technology tailored toward Unix platforms.

  • WPARS

o   Developed by IBM, this container technology is aimed at the AIX (Unix) based server OS platform.

o   Provides os-level environment isolation like other container models do.

o   Live application mobility (migration)

  • iCore Virtual Accounts

o   A Free Windows XP container solution. Provides os-level isolated computing environments for XP

  • Sandboxie

o   Developed by Invincea for Windows XP

o   “Sandboxes”, like a container, are created for isolated environments.

Related tools and mechanisms

  • Sysjail

o   A userspace virtualization tool developed for Open BSD systems. Much like the FreeBSS “jail”

  • Chroot

o   Kernel level function that allows a program to run in a host system in its own root filesytem.

  • Cgroups

o   Developed in 2006, used initially by Google Search

o   Unified in linux kernel by 2013.

  • Namespaces

o   Construct that allows partitioning and isolation of different resources so that they are only available to the processes in the container. Namespaces are Network (NET), UTS(hostname), PROC(process id), MNT (mount), IPC and User (Security Seperation)

  • Libcontainer

o   Written in Go programming language and developed by dotCloud/Docker it is a native Go implementation of “lxc-like” control over cgroups and namespaces.

  • Libct

o   Container library developed by engineers at Parallels

  • LPARs (Logical Partitions)

o   (Not linux related, not part of the related container “hype”) but an LPAR is essentially a partitioned set of network, compute, security, storage that can run processes and virtual machine.The difference is LPAR’s need an OS image.

Note: Kernel Namespaces and Cgroups became the defacto standard for creating linux containers and is used by most of the companies who have containerized technology, LXC, Docker, ZeroVM, Parallels, etc. 2013 was the first year that a linux kernel supporting OpenVZ worked with no patches, this was an example of kernel unification and the communities have since seen a boom in container technologies.

Different Containerization Models

            The models in which containers and containerization are formed have somewhat of a common denominator. They all need a shared kernel, and in some way have all made adaptations to the linux kernel to provide constructs like “security contexts”, “jails”, “containers”,“sanboxes”, “zones”, “virtual environments” etc. At a low-level the model remains consistent, partitioning host resources into smaller isolated environments, but when we look at how they are delivered, that’s where we see the different usecase models emerge.

Low-level Model

“Jails or Zones” with Patches Linux Kernel

  • Proprietary based solutions usually based off a patched linux kernel. OpenVZ, Parallels and Unix bases solutions started this way. Once cgroups and namespace were adopted into the kernel, this became the common way to bring a containerized solution to market.

“Cgroups and Namespaces”

  • Defacto standard for create Linux-based Isolated OS-level containers.

High-level Container Orchestration and Delivery Models

            The common ways containers are consumed are through some orchestration mechanism, usually through a portal or tool. This tool then communicates to a service level and requirements (YAML, Package List , or Built Images) get forwarded to a backend container engine. Whether that is LXC, Docker, OpenVZ, or others is up to the provider.

 Image

IaaS

            In this model containers are consumed as VM’s are, they can be requested with such attributes like CPU, Network, and Storage options. From the consumer’s point of view, it looks exactly like a VM.

            A few examples of this model are Openstack and Docker itself. The “docker-way” uses a userspace daemon that takes CLI or RESTful requests from a client. The daemon, which sits on the compute resources, utilizes a “container engine” like libcontainer or LxC to build the isolated environment based on a certain type of Linux image (from Docker Registry or Glance) provided. A note here that Docker Registry [4] is a platform for uploading and storing pre-built docker-images specific to an application, say a Fedora Image with Apache installed and configured.

            Openstack takes advantage of this Docker model and provides ways for Nova to integrate with Docker via a single driver to provide IaaS to consumers. It also integrates with Openstack Heat.

PaaS

            This is one of the major “best-fit” usecases for containers. Containers offer the agility, consistency, and efficiency PaaS platforms need, containers can be spun up/down, changed in seconds. This lends itself useful to platforms like OpenShift , Heroku, Cloudfoundry, and Openstack Solum. Applications can be imported and recognized at the same time that containers provide easily customizable computing environments on the fly for different types of workloads. The consumer does not interact with the container in the model, but rather the provider takes advantage of the container technology itself.

SaaS

            Containers lend themselves very well to sharing software; containers can easily be used to provide a software service on demand. An example of this case is http://www.memcachedasaservice.com/ [1], which uses containers to provide memcache-based service inside a container to the consumer. The benefit here is that you can provide these services in a largely distributed and scalable while also allowing the provider to densely utilizes its resources.

Pros & Cons of different containerization models

Model Pros Cons
IaaS Fast, Dense, Bare Metal performance. Limited Options, No windows VM’s. Lacks some security features compared to VM’s. (This can be argued though)
PaaS Efficient, Flexible, Dense, Easy to Manage Limited to Linux
SaaS Flexible, Easy to Manage Limited to Linux

Note* Although this says “limited to linux containers” there has been some talk about getting container orchestration solutions to be able to talk commonly between lightweight virtualization solutions so that describing a container could be common and thus this could deploy containers to LNX / Windows solutions. Libct is one effort here to unify container solutions.

Type of apps and workloads, what model works best

(Top use cases for containers, PaaS seems to stick out at best-fit)

HPC Worklods

            Containers do not have the overhead of a hypervisor layer and because of this they gain the performance of the host it is running on. Thousands of containers can be spun up in and instant to run distributed operations with power and scale.

Public and Private Clouds

            Containers lend themselves well to cloud-based solutions because of the density, flexibility, and speed of containers. Openstack, Google Compute and Tutum are all using containers in this space.

PaaS & Manages Services

            Probably one of the best use cases for containers in the market today. Providing PaaS involves a lot of orchestration and flexibility of the underlying service, containers are a clear winner in this space. CloudFoundry, Openshift, AWS Elastic BeanStalk, and Openstack Solum are PaaS solutions based on containers.

SaaS, Application Deployment

            A close second to a best-fit model to PaaS, containers also lend themselves well to SaaS architectures as containers can provide isolated, customizable environments for different software services independent of the host it is running on. Memcache as a Service, and Rackspace Cloud Databases are good examples of this.

Development and Test/QA

            One of this initial usecases for containers was to allow developers the freedom of running unit tests, trying new code, and running experiments in an isolated manner. Containers today are still widely used for this purpose and some system have there CI system built together with container technology to run isolated test jobs on new code.

An aside on Containers in the real world

Openstack + Containers

Nova

            Since the Havana release Openstack Nova has supported (in some way) using docker containers as an alternative or side-by-side to VM’s. Originally the openstack driver delivered was directly to a host, but now in the IceHouse release, Openstack Heat does the driving while the container engine is setup and run inside of a cloud instance. the nova driver is now part of stackforge and will possibly try to rejoin the nova code base in Juno.

http://blog.docker.com/tag/openstack-2/

Solum

            Openstack Solum is a PaaS incubation project in openstack that is currently part of stackforge that uses docker in a similar way that OpenShift and CloudFoundry do to orchestrate applications. Containers are used in the background to this project to build specialized workloads for the consumer.

https://wiki.openstack.org/wiki/Solum

Trove

            The DBaaS (Database as a Service) Openstack project is also using containers to deliver multi-tenant databases on-demand within the Openstack architecture.

CloudFoundry + Containers

            Cloud foundry Platform as a Service utilizes both LXC, and Docker technology under the covers. CloudFoundry had originally chosen LXC and built a tool called “warden” on top of it to manage the containers because they didn’t like using LXC outright. Docker containers also have something called a Dockerfile, which in short is a list of actions to be taken on the containerized environment once it’s built, like package management and installation to the startup and management of services. Much like a DevOps tool, this can be very powerful. This was a driving factor for the adopted version of Docker call “Decker” which implements their Droplet Execution Agent’s API. CF now lets you deploy docker and lxc based containers (droplets) using CF’s tooling.

Openshift+ Containers

            Openshift (by Redhat) much like the CloudFoundry Droplet provides something called Gears in its PaaS offering. Gears are native containers built from cgroups and namespaces that run the workloads. Openshift recently [2] adopted the Docker technology to deploy gears. This allowed them to take advantage of Docker inside their Cartridge and Gear system. By using Docker Images with metadata as a Cartidge and using Docker Containers as Gears(containers) based on the Cartridge. Redhat chose the container model because they could “achieve a higher density of applications per host OS and enable those applications to be deployed much more quickly than with a traditional VM-based approach”.

AWS+ Containers

            Amazon Elastic Beanstalk allows developers to load their applications into AWS while providing them flexibility and management within the PaaS. Elastic Beanstalk recently [3] adopted Docker so that developers can package or “build” Docker images (templates for the application) and deploy them into AWS with support from Elastic Beanstalk.

Google + Containers

Not (google+) but rather google using linux containers. I dont have much detail on the implementation here, but i’ve heard Google uses linux containers both, originally for Google Search, and now in its cloud compute engine. If anyone has more detail here, please comment 🙂

Legacy Code Support

            Containers are also used to run legacy application within the datacenter. Even when hardware refresh occurs, containers can implement older libraries and images to provide legacy applications to run on modern hardware.

New Technology Adoption

            Containers also offer a solution to early adoption to software. Containers offer secure isolated environments that let developers run, test, and evaluate new applications and software.

State of Security and Containers

            For truly secure container the root user in container can be mapped to “nobody” user/group and when this user gets out of container it doesn’t not affect “root” user on the host because “nobody” have very few privileges. Therefore:

  • Root on the container is not Root on the host.

            Not all container technologies utilize this security model but do implement SELinux, GRSEC, and AppArmour, which help. Safely running the workloads as non-root users will be the best way to help distort the lines between the security of VM and Containers.

            Other attack surfaces for containers can be (in order from less likely to more likely) the linux kernel constructs like cgroups and namespaces themselves, to the client or daemon responsible for responding to requests for host resources, which could be API, Websocket, or Unix Socket. Designed correctly, and used correctly, containers can be a secure solution.

There is a lot more on the security topic, you can start (here) for a good introduction.

Thanks for Reading

Please feel free to correct the history or any fact that I may have looked over too quick or didnt get right, I’d be happy to change it and get it correct. Containers are gaining ground in todays cloud infrastructures and there is a lot of interesting things going on, so keep your eyes and ears open because I’m sure you will hear more about them in the coming years.

Something I didnt touch on in the post was how storage works with containers. There are many different options that have pros and cons, Whether container solutions are using aufs, btrfs, xfs, device mapper, copy on write mechanisms, etc the main point is that they work at the file layer, not the block layer. While you could export iscsi/FC volumes to the hosts and use something lik e –volumes-from in Docker for persistency this is outside the direct scope of how containers maintain a low profile on the host. If you want more info or another post on this I can certainly do so.

Also, In coming posts, I think I will try and get some technical tutorials and demos around the container subject, keep posted, I will most likely be using Docker or LxC directly to do the demos!

Resources

docker architecture

References

[1] http://www.memcachedasaservice.com/,
    http://www.slideshare.net/julienbarbier42/building-a-saas-using-docker
[2] https://www.openshift.com/blogs/the-future-of-openshift-and-docker-containers
[3] http://aws.amazon.com/about-aws/whats-new/2014/04/23/aws-elastic-beanstalk-adds-docker-support/
[4] https://registry.hub.docker.com/